Wednesday, December 26, 2012
Blacklist of harass advertisement (ADV) SMS or call phone numbers (Rev: 1.12)
To replace my spoilt Motorola handphone (HP), I signed up a 2 years contract with StarHub (Singapore) on 19 Nov 2012 and received a new Apple iPhone5 HP. I had also chosen another HP number because iPhone5 is using nanoSIM card which my previous HP number (stored in an old SIM card) cannot be transfered to the nanoSIM card. Upon first power on the new iPhone5, I had already saw 2 ADV SMS inside the iPhone5 ?
Despite puzzled by how the ADV SMS was inside my iPhone5 upon powered on, I disclosed my new HP number to some of my friends through Short Message Service (SMS). Within a few days after receiving my iPhone5, I start to receive numerous harass advertisement (ADV) SMS and a few calls from unknown phone numbers.
I received the below reply from StarHub Customer Service regarding my "used" HP number (only realised that it was an used HP number after my email feedback to StarHub Customer Service about those harassing ADV SMS/calls):
We also seek your understanding that new numbers may not be available all the time. However, we wish to assure you that every used number that is released will always be kept dormant first for at least six months before re-circulation for sign-ups. In your case, we note that mobile service xxxxxxxx was previously terminated in December 2010 and remained unused to date prior to your sign up. We regret any inconvenience caused by this issue.
You may wish to consider changing your mobile service number at our StarHub Customer Service Centres. For more information on the locations of our StarHub CSCs, please visit our website at http://www.starhub.com/customerservice.
As a gesture of goodwill, StarHub will waive the change of number fee of $30 (before GST). This will be processed by our consultants when you visit our CSCs to request for a change of number.
[JackNg: After calling StarHub Customer Care Hotline (1633), I was told that StarHub will waive the nanoSIM card fee (S$37.45) and the changing of HP number fee (S$30). However, I still need to pay S$30 for selecting another HP number.]
In my queries email to StarHub Customer Care, I asked StarHub at least 3 times in my email on whether it can filter those harass ADV SMS from unknown parties or telemarketers. StarHub Customer Care never answer my filtering SMS question by email. StarHub email reply by different customer officers to my queries normally takes more than 4 working days. In StarHub reply email, you will always see this sentence "We are currently experiencing high volume of queries and apologise for the extended time taken to respond to you...Should you have any further queries on mobile services, please e-mail us at this address or fax in to (+65) 6720 5000. We will be glad to assist you".
On 14 Jan 2013 (Monday) morning, I received another ADV SMS again. Out of frustration on getting no reply from StarHub on my email sent on 9 Jan 2013 (Wednesday), I impulsively sent 10 emails at the same time with the "Gentle reminder" on top of my repeating email queries to StarHub Customer Care, hoping to fill up their monitor screen and catch their attention. About half an hour later, I also impulsively sent another email demanding for their director email address or contact number so that I can directly feedback my ADV SMS harass problem and their poor customer service problem to him/her. On 14 Jan 2013 evening time, I finally received StarHub Customer Care email reply about the availability of my new handphone number queries. I decided to go down to StarHub Customer Service Centre at Vivo City (1 Harbour Front Walk, #02-202) to pay S$30 to change to a new handphone number to solve the harass ADV SMS and call problems.
At the StarHub Customer Service Centre counter, I asked the StarHub customer service officer on whether StarHub can filter those harass ADV SMS from unknown parties or telemarketers. To my surprise, the answer from the StarHub customer service officer is YES. StarHub can perform the filtering of ADV SMS through their system if we provide them the contact numbers from those ADV SMS.
For the below ADV SMS senders:
FLOResi
GResidence
JYSlim (90241119 from the ADV SMS message)
WoodlandEC (82285397 or 91015266 from the ADV SMS message)
You will discover that your iPhone5 will not shown any contact numbers from those ADV SMS senders and your reply SMS will fail to deliver to these ADV SMS senders. According to StarHub customer service officer, these ADV SMS are sent through a computer system of a registered company name. Hence, your iPhone5 will not shown any contact number which is the reason why your reply SMS will fail to deliver to these ADV SMS senders. If StarHub sent you an SMS through their computer system, your SMS will shown the name "StarHub" without any contact number.
I recalled having occasionally receiving problems [One at Park Mall (beside Singapore Shopping Center) and another one inside the MRT] where my friends called me (their Samsung handphone had the dialing ringing sound) but my handphone did not ring at all. As a result, I did not picked up their calls and my iPhone5 indicated missing calls. The StarHub customer service officer told me that she will reset my HP number mobile network to see whether it will solve the occasionally receiving problems.
At home, my iPhone5 now shown only 3G network. Unlike in the past, sometimes it will shown 3G or LTE network at home. While walking on the road, my iPhone5 is on LTE network. I tested calling my iphone5 using the home and working place phone, the occasionally receiving problem did not appear.
After getting the new nanoSIM card that contains my new handphone number from StarHub, I took out my old nanoSIM card from iPhone5 and replaced it with the new nanoSIM card. In iPhone5, my previous SMS and contact numbers are still stored inside my iPhone5 after changing to the new nanoSIM card. This shown that the nanoSIM card did not store the SMS and contact numbers as compare to SIM card where your SMS and contact numbers can be stored inside the SIM card.
There is an iPhone application (app) calls iBlackList that allows you to limit who can pester you with calls and text messages. However, iBlackList only works for jail broken iPhone devices which will void your iPhone5 warranty.
A fake iPhone app calls iBlacklist Mobile Manager (US$14.98) claimed to be able to perform the ADV SMS/calls limit functions, but it was a scam. Please read the review and DO NOT buy this fake iPhone app.
In Singapore, a government-proposed National Do-Not-Call Registry enables consumers to opt-out of all unsolicited telemarketing calls or SMS/fax messages. Organisations will be required to check the registry and ensure that they do not call, SMS or fax messages to the numbers registered unless specific permission was given.
The Ministry of Communications and Information (MCI) had set up a Personal Data Protection Commission (PDPC) and a Data Protection Advisory Committee on 2 January 2013 to respectively administer and advise on the Personal Data Protection Act (PDPA). To administer and enforce the PDPA, the PDPC, supported by the Infocomm Development Authority of Singapore (IDA), was established on 2 January 2013. More info at "Commission and Advisory Committee to Administer and Advise on Personal Data Protection Act".
PDPC will set up the DNC registry in early 2014 for public registration and the provisions relating to the main data protection coming into force in mid 2014. After the transition period, the PDPC may conduct investigations - upon complaint or on its own accord – to determine whether an organisation is complying with the PDPA. More info at "Enforcement of the Act".
From 2 January 2013, more information on data protection and related matters, including the DNC registry, can be obtained through the PDPC website, email or hotline number (+65 6377 3131).
Anyway, the below is a list of harassed ADV SMS or calls that I had received before I change my HP number:
+65 (Country Code 65: Singapore)
64383000
81127329
81345079
82285397 (WoodlandEC)
82988703
83225711
83329050
83838508
84983658
84987674
90053888
90241119 (JYSlim)
90916226
91015266 (WoodlandEC)
91230050
91456440
91817025
91878578
91870348
92352492
93978451
94896241
96474577
98589628
98590132
98909572
+62 (Country Code 62: Indonesia)
+62 599121
+62 8118074739
+86 (Country Code 86: China)
+86 215587
References
[1] iBlackList for iPhone [iBlackList is not available at Apple Store]
[2] Country Codes, Phone Codes, Dialing Codes, Telephone Codes, ISO Country Codes
[3] Commission and Advisory Committee to Administer and Advise on Personal Data Protection Act
[4] PDPC website on data protection and related matters, including the DNC registry. PDPC info on "Enforcement of the Act".
Wednesday, December 12, 2012
Solved STOP C000021a Fatal System Error on Session Manager Initialization system process terminated unexpectedly with status 0xC000003a on Windows 7 Professional SP1 OS in a Dell Optiplex 9010 pc (Rev: 1.2)
There are 3 partitions in the Dell Optiplex 9010 pc [Intel Core i7-3770 (3.40 Ghz) CPU, 32 GB DDR3 1600 Mhz memory, 1 TB SATA hardisk drive, etc]:
- OEM Partition (Dell Utility FAT16 partition) (about 39 MB)
- Dell Recovery Partition (about 10.3 GB, System, Active, Primary partition)
- Windows 7 Professional SP1 x64 Operating System (OS) Partition (about 921 GB, Boot, Page file, Crash dump, Primary partition)
After booted up from the Acronis Disk Director 11 boot CDROM, I deleted the Dell Recovery Partition and resized the Windows 7 Professional SP1 x64 OS partition to take over the 10.3 GB space from the previous Dell Recovery Partition. After that, I reduced the Windows 7 Professional SP1 x64 OS partition to about 200 GB so that I can later format all the available free space to have a d:\ drive with about 800 GB partition size. Finally, I set the Windows 7 Professional SP1 x64 OS partition as an active partition to prevent the "Operating system not found" error.
I reboot the Dell Optiplex 9010 pc from a Windows 7 System Repair Disc (created from Windows 7 Control Panel -> Backup and Restore -> “Create a system repair disc”) in order to avoid the "BOOTMGR is missing. Press Ctrl+Alt+Del to restart" error.
At the "System Recovery Options" stage, a prompt automatically appeared with the below message:
Windows found problems with your computer's startup options. Do you want to apply repairs and restart your computer ?
I clicked the "Repair and restart" button and the Dell Optiplex 9010 pc rebooted. However, the "BOOTMGR is missing. Press Ctrl+Alt+Del to restart" error appeared. I booted the Dell Optiplex 9010 pc from the Windows 7 x64 System Repair Disc again. At the "System Recovery Options" stage, I clicked to select the "Windows 7 Professional (recovered)" and click the "Next" button. At the next "System Recovery Options" stage, when the automatically "Startup Repair" stage had completed, another message appeared:
Restart your computer to complete the repairs.
I clicked the "Finished" button and the Dell Optiplex 9010 pc rebooted. After showing the Windows Logo, the monitor screen shown an "autochk program not found - skipping AUTOCHECK" and later the below Blue Screen of Death (BSoD) error:
STOP: C000021a {Fatal System Error}
The Session Manager Initialization System process terminated unexpectedly with a
status of 0xC000003a (0x00000000 0x00000000).
The system has been shut down.
For detail of STOP C000021a error, please refer to "Bug Check 0xC000021A: STATUS_SYSTEM_PROCESS_TERMINATED (Windows Debuggers)".
I reboot the pc and press [F8] repeatly to get the Windows Boot List. I have tried "Last known good configuration" and "Safe Mode" respectively but both boot options still gave the same boot up errors:
"autochk program not found - skipping AUTOCHECK"
STOP: C000021a {Fatal System Error}
The Session Manager Initialization System process terminated unexpectedly with a
status of 0xC000003a (0x00000000 0x00000000).
The system has been shut down.
The same boot up errors also appeared even if you change the SATA operation mode in BIOS to "AHCI" or "RAID On (Intel Rapid Restore Technology)" mode. If you changed the SATA operation mode in BIOS to "ATA" mode, it will show a "STOP: 0x0000007B" BSoD error.
I booted the Dell Optiplex 9010 pc from the Windows 7 x64 System Repair Disc again. At the Windows 7 x64 Recovery Console, the below bootrec command are issued:
# bootrec /fixmbr
The operation completed successfully
# bootrec /fixboot
The operation completed successfully
# bootrec /rebuildbcd
Scanning all disks for Windows installations.
Please wait, since this may take a while...
Successfully scanned Windows installations.
Total identified Windows installations: 0
The operation completed successfully
# chkdsk d: /f
(OEM Partition is c:\ drive and Windows 7 Professional OS partition is d:\ drive)
Chkdsk discovered free space marked as allocated in the Master File Table (MFT) bitmap.
Chkdsk discovered free space marked as allocated in the volume bitmap.
Windows has made corrections to the file system.
# bootrec /scanos
Scanning all disks for Windows installations.
Please wait, since this may take a while...
Successfully scanned Windows installations.
Total identified Windows installations: 0
The operation completed successfully
Solution
Persistent drive letters (eg: drive letter, c:\ drive for the Windows 7 Professional OS) allocations are contained in the HKEY_LOCAL_MACHINE\System\MountedDevices registry key. We need to mount the original Windows 7 SYSTEM hive from the c:\Windows\System32\config directory and delete the MountedDevices registry key from the HKEY_LOCAL_MACHINE\System\.
During the Windows boot process, if the MountedDevices registry key is missing, Windows will auto recreate the HKEY_LOCAL_MACHINE\System\MountedDevices registry key and new drive letters will be assigned.
I booted the Dell Optiplex 9010 pc from the Windows 7 x64 System Repair Disc again. At the Windows 7 x64 Recovery Console,
- # regedt32
(To open the Registry Editor) - In the Registry Editor, kindly click to select the HKEY_LOCAL_MACHINE. Then, please click File -> Load Hive.
Note:
When we boot into the Windows 7 x64 Recovery Console, we are actually booted into a RAMDRIVE (x:\ drive). When we open the Registry Editor, we are looking at the hives from the RAMDRIVE (x:\ drive) and not from the installed Windows 7 Professional OS (d:\ drive). - d:\ drive is the Windows 7 Professional OS drive in the Windows 7 x64 Recovery Console. Kindly browse to d:\Windows\System32\config directory and select the SYSTEM file. Click the "Open" button and name it as "temp".
- Kindly navigate to the HKEY_LOCAL_MACHINE\temp and click the MountedDevices to select it. Hit the "Delete" key on the keyboard to delete the
HKEY_LOCAL_MACHINE\temp\MountedDevices registry key. You will be prompt:
Confirm Key Delete
Are you sure you want to permanently delete this key and all of its subkeys ?
Click the "Yes" button to delete the MountedDevices registry key and all of its subkeys from HKEY_LOCAL_MACHINE\temp. - Kindly click the temp key to select it. Then, please click File -> Unload Hive. Kindly click "Yes" when prompt to confirm Unload Hive. Finally, please close the Registry Editor and exit from the Windows 7 x64 Recovery Console in order to reboot the Dell Optiplex 9010 pc.
The Dell Optiplex 9010 pc will boot normally to the login screen and the BSoD error of STOP: C000021a {Fatal System Error} did not appear.
References
[1] Editing the MountedDevices Registry Key
[2] "Bug Check 0xC000021A: STATUS_SYSTEM_PROCESS_TERMINATED (Windows Debuggers)"
[3] Operating system comes up with Blue Screen Error: Stop c000021a
Monday, December 10, 2012
Uninstall Remote Desktop Protocol 8.0 (KB2592687) update for Windows 7 Enterprise SP1 OS (Rev: 1.0)
Microsoft KB2592687 is the Remote Desktop Protocol 8.0 update for the Windows 7 SP1 Operating System (OS) and Windows Server 2008 R2 SP1 OS.
In Windows 7 Enterprise SP1 OS, after updating the Remote Desktop Protocol from v7.1 to v8.0 by applying the Microsoft KB2592687 update, the Windows XP Mode virtual machine (Guest OS) integration features that runs from the Windows Virtual PC failed to show the sharing drives of the physical Windows 7 Enterprise SP1 OS (Host OS). As a result, the sharing, copying and pasting integration features between the Windows XP Mode virtual machine and the physical Windows 7 Enterprise SP1 OS share drives through Remote Desktop Connection (RDC) failed.
How to uninstall Remote Desktop Protocol 8.0 (KB2592687) update in Windows 7 Enterprise SP1 OS
In Windows 7 Enterprise SP1 OS, kindly click Start -> Control Panel -> Programs -> Programs and Features -> Installed Update.
Under "Microsoft Windows (xxx)" Name where my xxx is shown as 116, kindly click "Update for Microsoft Windows (KB2592687)" to select it. Then, kindly click "Uninstall" at the top (besides Organize) to start uninstalling the "Update for Microsoft Windows (KB2592687)".
When prompt on the pop-up "Uninstall an update":
Are you sure you want to uninstall this update ?
Kindly click the "Yes" button.
After the "Update for Microsoft Windows (KB2592687)" had finished uninstalled, please restart your computer by clicking the "Restart Now" button to apply the changes. Before restarting, kindly save any open files and close all programs. After the computer had restarted and boot up, it will applied the update configuration and auto restart again to finish applying the changes.
Uninstalled the "Update for Microsoft Windows (KB2592687)" will revert back the Remote Desktop Protocol from v8.0 to v7.1. Using Remote Desktop Protocol v7.1, the Windows XP Mode virtual machine (Guest OS) integration features that runs from the Windows Virtual PC shown the sharing drives of the physical Windows 7 Enterprise SP1 OS (Host OS). As a result, the sharing, copying and pasting integration features between the Windows XP Mode virtual machine and the physical Windows 7 Enterprise SP1 OS share drives through Remote Desktop Connection (RDC) worked in Windows Explorer.
Solved adding Google as the default search engine add-on in Internet Explorer (IE) 9 (Rev: 1.0)
In Internet Explorer (IE) version 9.0.8112.16421, the default search engine is Bing. When trying to add Google as the default search engine add-on in Internet Explorer (IE) version 9.0.8112.16421, the Microsoft IE Gallery website at http://www.iegallery.com/en-sg/addons?callback=true&featuretype=2 indicates "No results were found" and does not shown any available search providers.
As my location is at Singapore, the Microsoft IE Gallery website detects and shown the localized search engines add-ons for Singapore (sg) with the URL
http://www.iegallery.com/en-sg/addons?callback=true&featuretype=2
where en-sg indicates English-Singapore. Unfortunately, the IE 9 add-ons for Singapore does not has any search providers for the IE 9 add-ons yet. Hence, "No results were found" error is shown at the Microsoft IE Gallery website.
Solution
As the IE9 add-ons page for the country, United States (US) contains most of the popular search providers, I change the URL to
http://www.iegallery.com/en-us/addons?callback=true&featuretype=2
where en-us indicates English-US. Microsoft IE Gallery website display those various IE 9 add-ons search engines for United States (US). I clicked on the Google image to add the Google Search add-on for IE9 and had successfully change my default search engine in IE9 to Google.
If the above link failed, please try http://www.iegallery.com/en-us/addons#searchproviders to add the search providers add-ons for IE9.
Friday, December 7, 2012
iPhone5 quick setup to maximize the battery and protect privacy (rev: 1.3)
I bought an Apple iPhone5 (iOS v6.0.1 or higher version) on Nov 2012 to replace the spoiled old Motorola handphone. I performed a quick setup as shown below to maximize the battery and protect privacy by turning off those features that I do not need:
In iPhone5 screen, please tap "Settings".
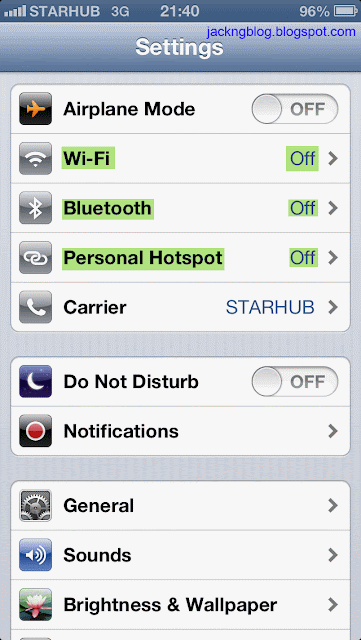
WiFi -> Off
I had already setup the WiFi at home and at work before I turn off the WiFi to maximize the battery. I turn on the WiFi only when I need to use it at home or at work. The "Ask to Join Networks = Off" so that known network will be joined automatically.
Bluetooth -> Off
If you are using hands-free Bluetooth headset, Apple Wireless Keyboard or other Bluetooth device, please turn on the Bluetooth so that iPhone5 can communicate with the Bluetooth device.
Personal Hotspot -> Off
You can use Personal Hotspot (iPhone 4 or later) to share your iPhone's internet connection with a computer or other devices (eg: iPod touch, iPad or other iPhone) via WiFi, Bluetooth or USB. Additional usage charge may apply. Personal Hotspot works only if iPhone is connected to the Internet over the cellular data network.
Do Not Disturb -> Off (optional)
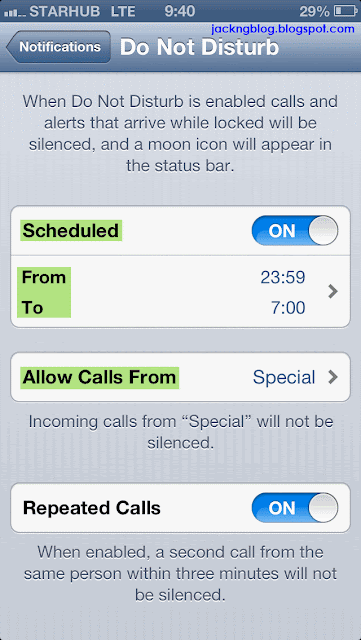
If you manually turn on the "Do Not Disturb", an "eclipse moon" status icon will appear at the top of the iPhone5 screen. When "Do Not Disturb" is manually turn on, any calls or alerts that arrive while iPhone is locked will be silenced, and you will not be noticed unless you manually check your calls or alerts.
You can turn on the "Do Not Disturb" schedule and set the starting and ending hours of the "Do Not Disturb" (Settings -> Notifications -> Do Not Disturb). I set my starting and ending hours from 23:59 pm to 7:00 am respectively. I "Allow Calls From" "Special" groups that I had created in the "Contacts-Excel Lite" (The Lite version allow you to export or import 150 free contact entries) free application. The "Contacts-Excel" full version (US$2.99) has no limit on the number of contact entries.
Settings -> Notifications -> Do Not Disturb
Settings -> Notifications -> In Notification Center (Top screen)

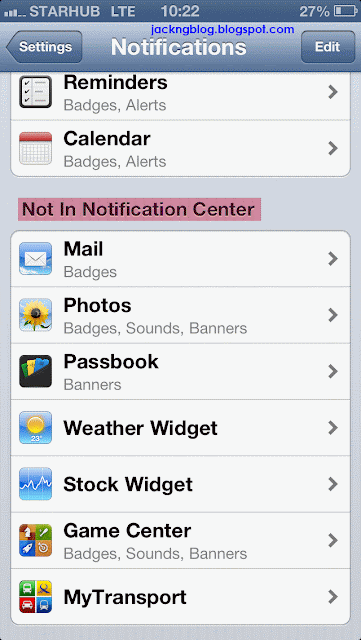
Settings -> Notifications -> Not in Notification Center (Bottom screen)
Settings -> Notifications -> Phone
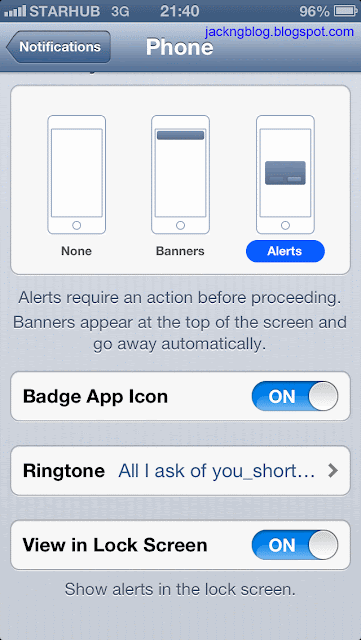
To set personal iPhone5 ringtone, please refer to iPhone5 Ringtones - Step by Step Procedures to Create Free Ringtone on iTunes 10. (JackNg: Procedures also works for iTunes 11.0.0.163)
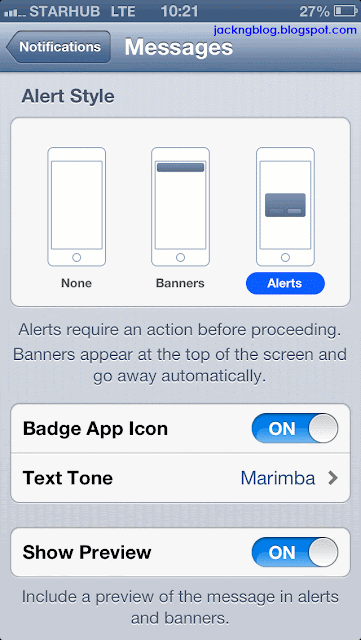
Settings -> Notifications -> Messages
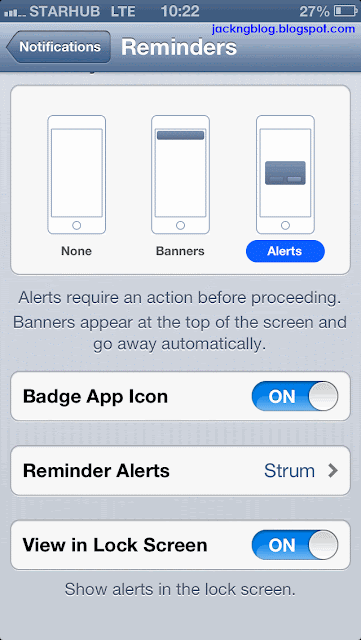
Settings -> Notifications -> Reminders
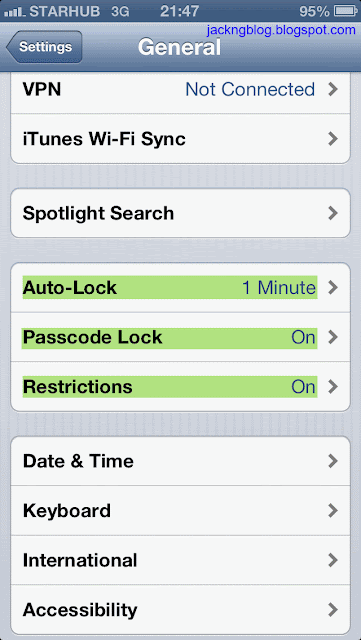
Settings -> General (Middle screen)
Settings -> General -> About -> Advertising

iOS 6 introduces the Advertising Identifier, a non-permanent, non-personal, device identifier that advertising networks will use to give you more control over advertisers' ability to use tracking methods. If you choose to limit ad tracking, advertising networks using the Advertising Identifier will no longer gather information to serve you targeted ads. As I do not want those advertisers to track my preferences and behaviors, I block those ad tracking by turning on the "Limit Ad Tracking".
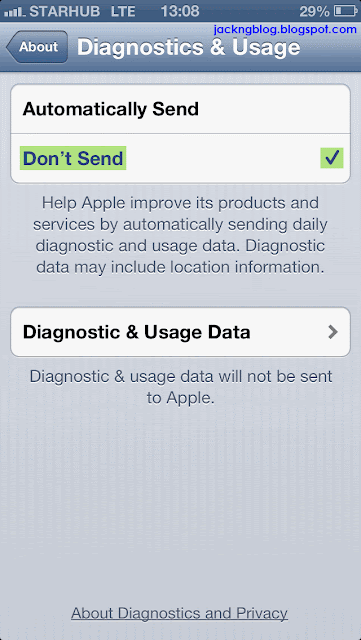
Settings -> General -> About -> Diagnostics & Usage
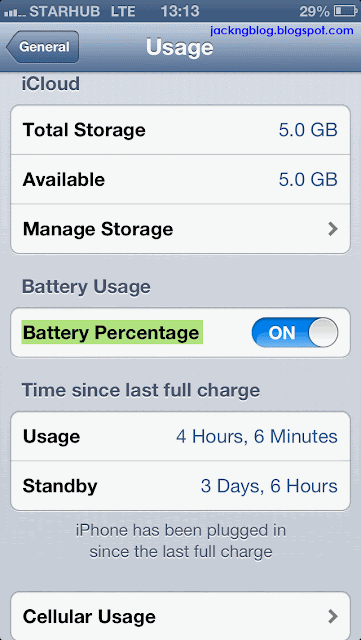
Settings -> General -> Usage (Middle screen)
Settings -> General -> Siri
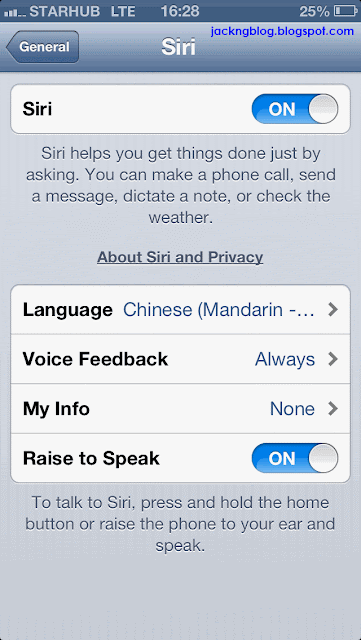
Siri (iPhone 4S/5 or later) is the intelligent personal assistant that helps you get things done just by talking. Siri understands natural speech, so you don’t have to learn specific commands or remember keywords. Siri requires Internet access (cellular data charges may apply) in order to work properly. I set the Siri language to "Chinese (Mandarin - China)" because it helps me to save time to send Chinese SMS through speaking to the iPhone5.
In iPhone5, kindly tap "Settings" -> "General" -> "Passcode Lock". Under "Allow Access When Locked:", Siri by default is set to "ON". As Siri is activated by pressing the Home button (until Siri appears), Siri can pose a security risk for your iPhone5 data because it can bypass the Passcode Lock since Siri is "Allow Access When Locked:".
If you are security conscious and have activated a Passcode Lock for your iPhone5, you will want to ensure that Siri is not allowed to bypass that Passcode Lock. In iPhone5, kindly tap "Settings" -> "General" -> "Passcode Lock". Under "Allow Access When Locked:", switch Siri to "OFF".
Settings -> General -> Restrictions (Top screen)
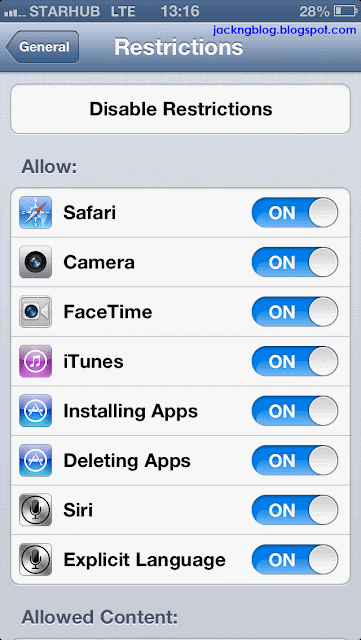
Settings -> General -> Restrictions (Middle screen 1)
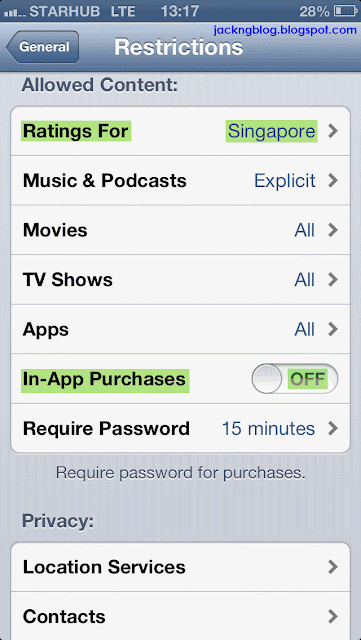
Settings -> General -> Restrictions (Middle screen 2)
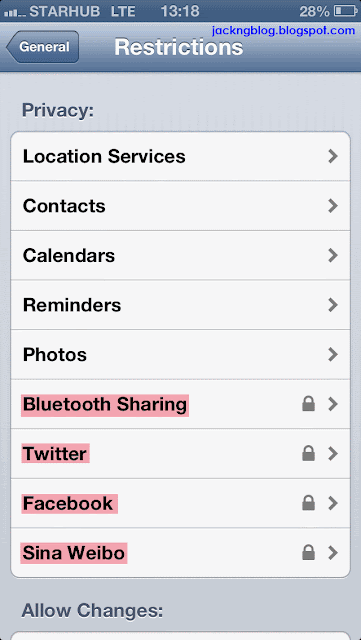
Bluetooth Sharing, Twitter, Facebook and Sina Weibo have restrictions set to "Don't Allow Changes" (shown as a Lock icon).
Bluetooth
Disallow changes locks the settings and prevent new apps from sharing data via Bluetooth when we are not using them.
Twitter / Facebook / Sina Weibo
Disallow changes locks the settings and prevent new apps from using our Twitter / Facebook / Sina Weibo account.
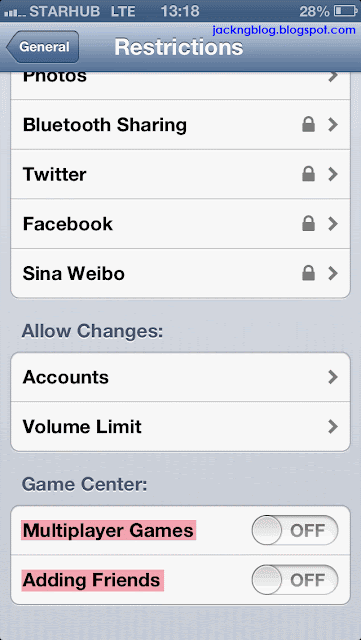
Settings -> General> -> Restrictions (Bottom screen)
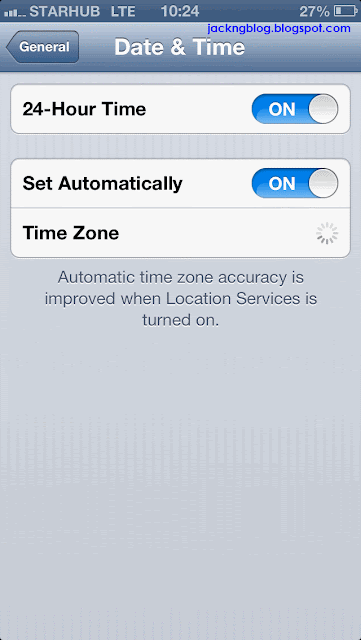
Settings -> General -> Date & Time
Settings -> General -> Keyboard -> Keyboards

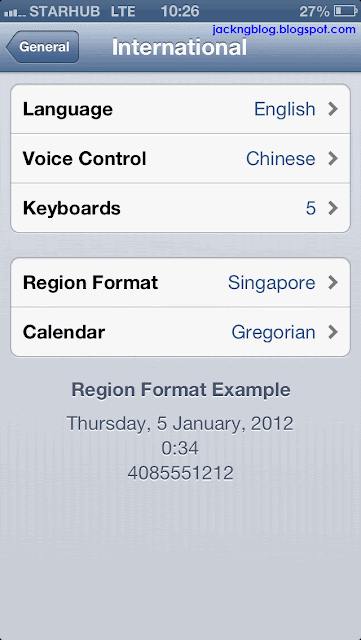
Settings -> General -> International
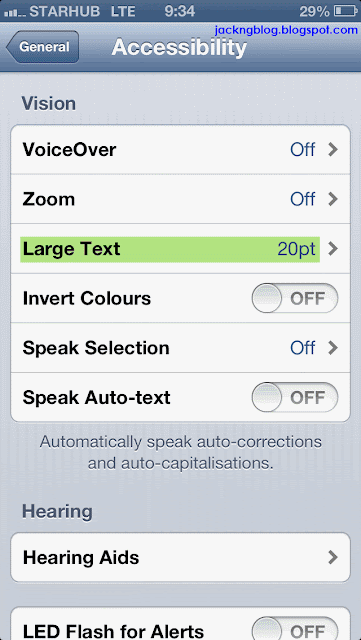
Settings -> General -> Accessibility (Top screen)
Settings -> General -> Accessibility -> AssistiveTouch (Bottom screen)
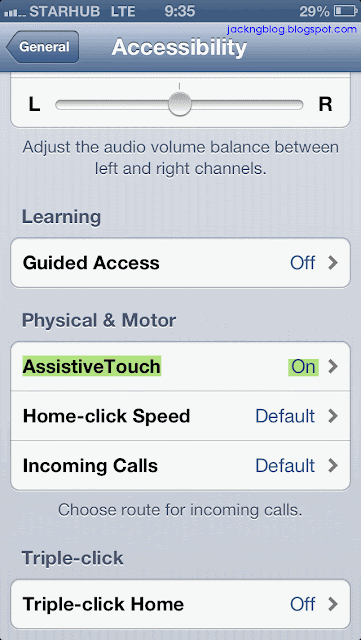
AssistiveTouch helps you use iPhone if you have difficulty touching the screen or pressing the buttons. However, I find that AssistiveTouch is very useful in replacing the spoilt Home button, Lock button or Volume buttons in iPhone5.
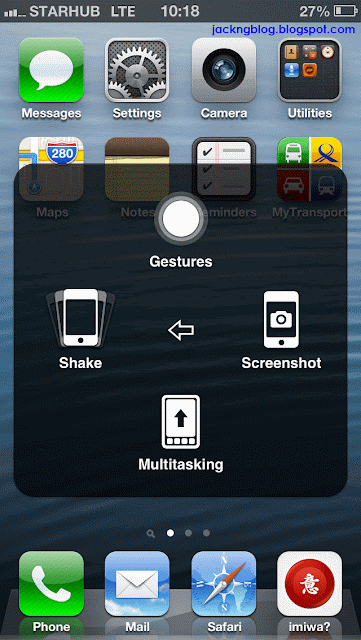
Turn on AssistiveTouch (Settings -> General -> Accessibility -> AssistiveTouch -> AssistiveTouch -> ON) and a small round white button will then appear on your screen. When you touch the white button (AssistiveTouch), a list of software commands (eg: Home, Lock Screen, Volume Up, Volume Down, Screenshot, Multitasking, etc) will appear. You can now use these software commands to replace your spoilt iPhone5 buttons, especially the Home button because it is often used and tend to wear out faster than the other buttons. You can drag the white button to different places on the iPhone5 screen to suit your convenience.
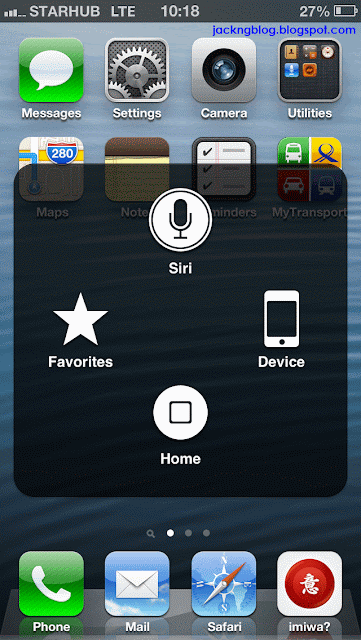
AssistiveTouch initial pop up screen
(Siri, Device, Home or Favorites)
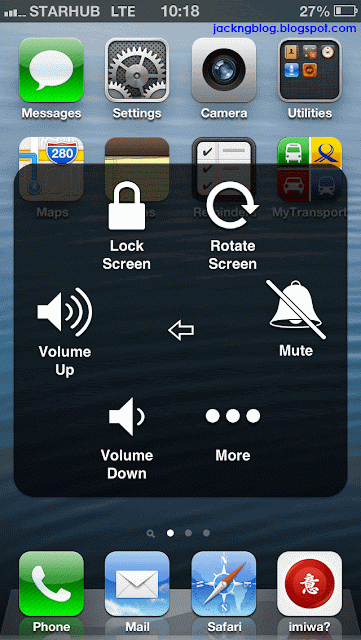
AssistiveTouch 2nd pop up screen after tapping Device
(Device -> Lock Screen, Rotate Screen, Mute, Volume Down or Volume Up)
AssistiveTouch 3rd pop up screen after tapping Device -> More
(Device -> More -> Gestures, Screenshot, Multitasking or Shake)
Settings -> Sounds
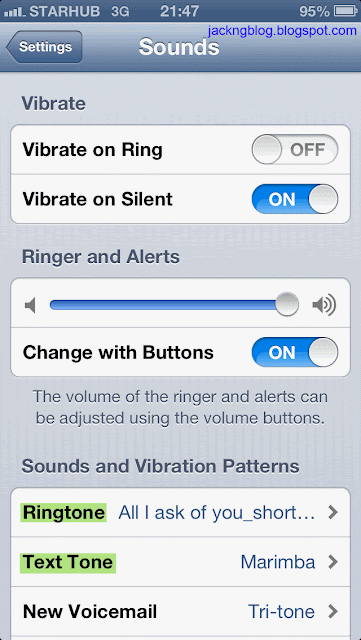
To set personal iPhone5 ringtone, please refer to iPhone5 Ringtones - Step by Step Procedures to Create Free Ringtone on iTunes 10. (JackNg: Procedures also works for iTunes 11.0.0.163)
Settings -> Sounds

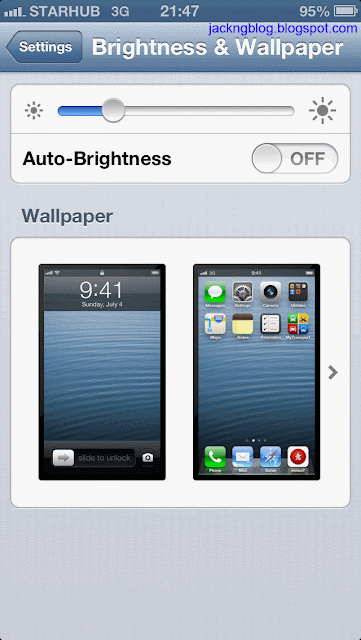
Settings -> Brightness & Wallpaper
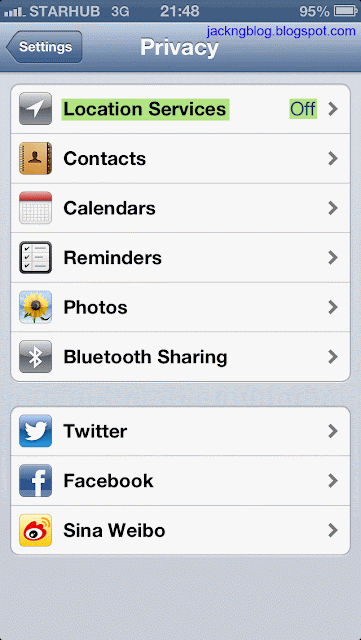
Settings -> Privacy
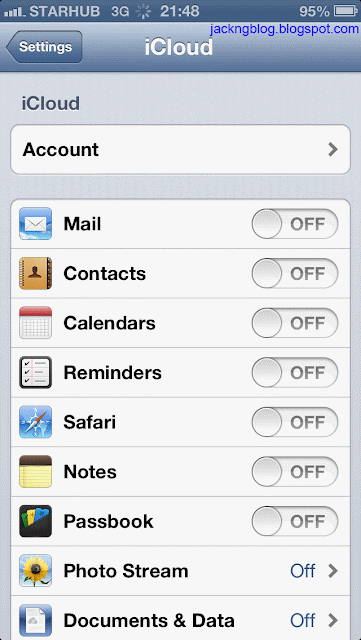
Settings -> iCloud (Top screen)
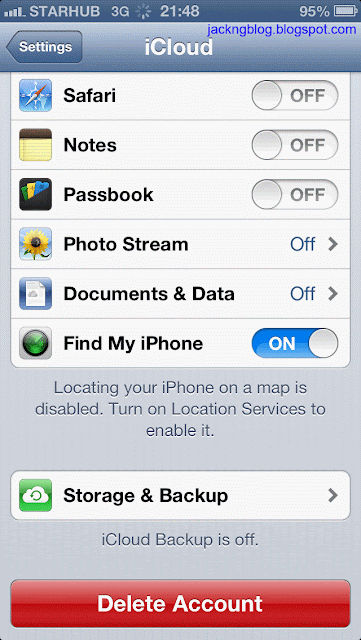
Settings -> iCloud (Bottom screen)
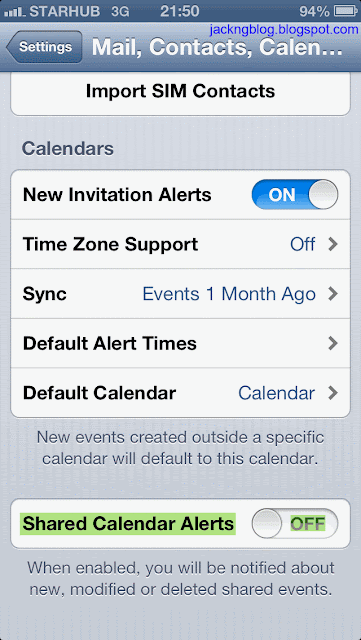
Settings -> Mail, Contacts, Calendars (Top screen)

Settings -> Mail, Contacts, Calendars -> Fetch New Data-> Push
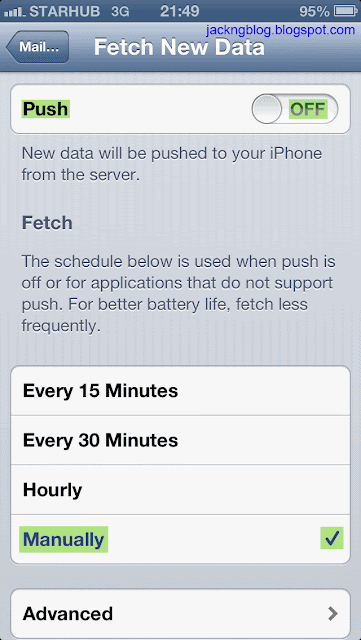
As the iPhone5 screen is small, I seldom use it to read email unless it is urgent. Hence, I turned off the Push so that it will not fetch new email to my iPhone5 from the Microsoft Exchange email server. I set the Fetch to manually to maximize the battery and to read email only when I want it.
Settings -> Mail, Contacts, Calendars -> Fetch New Data -> Advanced

Settings -> Mail, Contacts, Calendars (Middle screen)
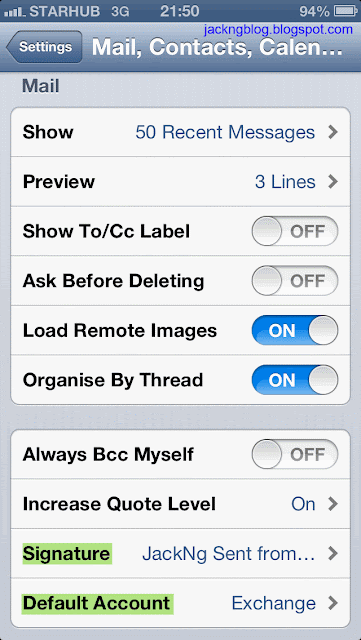
After setting up my email signature and my default email account, I turned off the mail application to maximize the battery. I will turn on the mail application only when I need to read my email.
Settings -> Mail, Contacts, Calendars (Bottom screen)
Settings -> Messages

I don't want to inform those harassed advertisement (ADV) senders that I had read their SMS. Hence, I turned off the "Send Read Receipts" in the Messages.
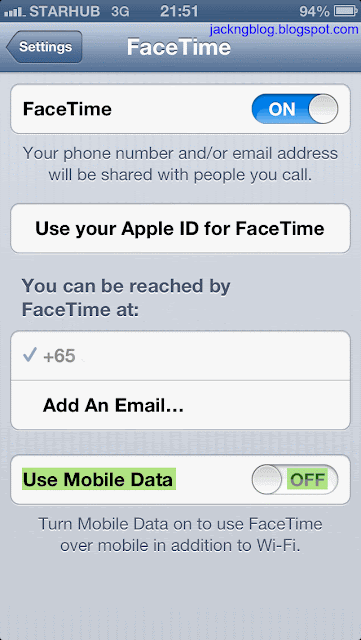
Settings -> FaceTime
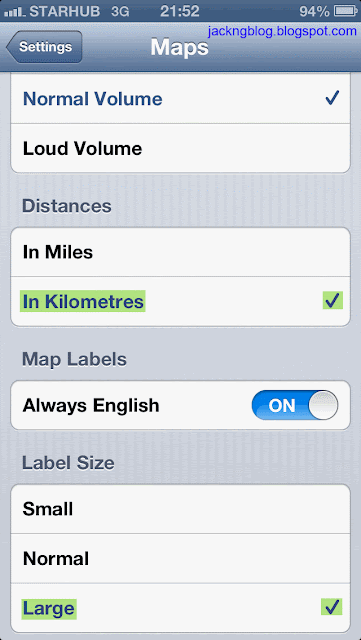
Settings -> Maps
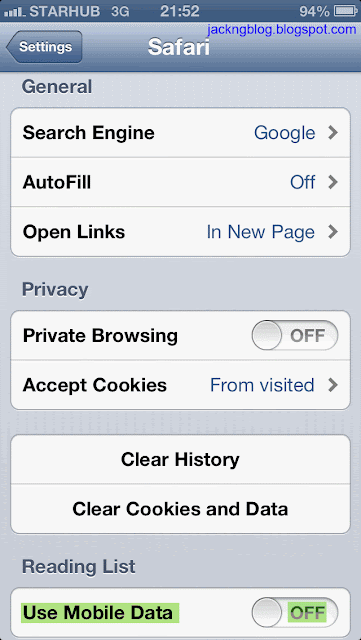
Settings -> Safari
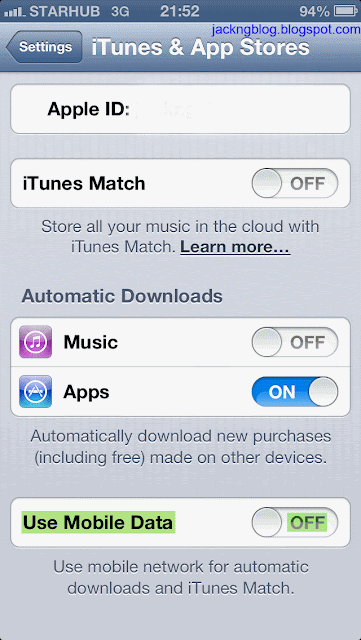
Settings -> iTunes & App Stores
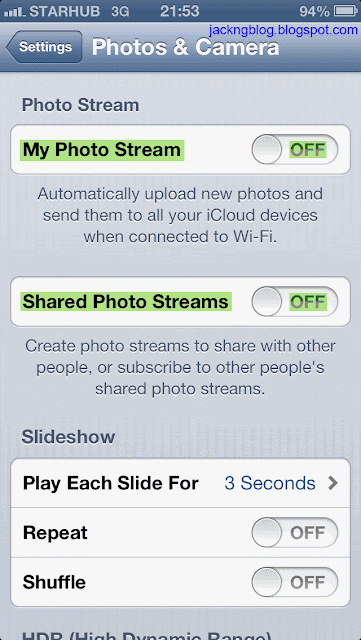
Settings -> Photos & Camera
References
[1] iPhone User Guide (For iOS 6 software)
[2] Contacts-Excel Lite" (The Lite version allow you to export or import 150 free contact entries) free application. The Contacts-Excel" full version (US$2.99) has no limit on the number of contact entries.
[3] iPhone5 Ringtones - Step by Step Procedures to Create Free Ringtone on iTunes 10. (JackNg: Procedures also works for iTunes 11.0.0.163)
Tuesday, October 2, 2012
Solved "MsiOpenPackageEx failed with error 1625" or "1628: Failed to complete installation" when installing FEKO v6.2 (32 bits) on certain Windows OS (Rev: 1.0)
Problem description
During FEKO v6.2 (32 bits) (474,465,152 bytes) installation on some Windows Operating System (OS) machines (eg: Windows XP x64 OS), the FEKO v6.2 installer may fail with:
MsiOpenPackageEx failed with error 1625 or
1628: Failed to complete installation
This is probably caused by the following:
Starting with Microsoft Windows XP, a security policy named Software Restriction Policies (also known as SAFER) was introduced to help users avoid running unsafe files. Windows Installer uses Software Restriction Policies to verify the signatures of signed .msi or .msp package files. Windows Installer does this to make sure that the files were not tampered with before they are installed on the computer. Windows XP and Windows Server 2003 require the whole .msi or .msp package file to be loaded into one contiguous piece of memory in the address space of the Windows Installer process.
If a .msi or .msp package file is too large to fit into a contiguous piece of virtual memory, Windows Installer cannot verify that the package is correct. You might encountered the "MsiOpenPackageEx failed with error 1625" or "1628: Failed to complete installation" error during FEKO v6.2 installation. The workaround that is described below enables Software Restriction Policies to use less virtual memory to perform the signature verification. Therefore, Windows Installer can verify any file size.
Workaround
Assume that you are running Windows XP x64 OS.
- Kindly click Start -> Run. Kindly type 'secpol.msc' (without the quotes), and then click OK. This will open the Local Security Settings.
- Kindly click "Software Restriction Policies".
If no software restrictions are listed, please right-click on "Software Restriction Policies", then left-click on "Create New Policy". - Under "Object Type", please double-click Enforcement.

- Click "All users except local administrators", and then click OK. Please restart the computer for the change to take effect.

- Kindly install FEKO v6.2 again.
After FEKO v6.2 is installed, please reset the enforcement level by following the previous workaround steps. However, in step 4, please click "All users" instead of "All users except local administrators".
Reference
[1] FEKO Support, FEKO Suite 6.2 Known Problems and Bugs (for FEKO contract customer only)
Friday, September 28, 2012
Solved "This operation has been cancelled due to restrictions in effect on this computer. Please contact your system administrator" error when clicking a hyperlink in Microsoft Word (Rev: 1.0)
When clicking a hyperlink in Microsoft Word in a Windows XP Professional SP3 Operating System (OS), a pop up with the below error message appeared:
This operation has been cancelled due to restrictions in effect on this computer. Please contact your system administrator
Solutions
- In Windows XP OS, please click Start -> Run... and kindly type regedt32 to open the Registry Editor.
- In the Registry Editor, please browse to
HKEY_LOCAL_MACHINE\SOFTWARE\Classes\htmlfile\shell\open\command
Please check if the (Default) name of REG_SZ type has the data value of
"C:\Program Files\Internet Explorer\IEXPLORE.EXE" -nohome - In the Registry Editor, please browse to
HKEY_CLASSES_ROOT\.html
The (Default) name of REG_SZ type has a data value of chromefile. Since the Google Chrome browser had already been uninstalled in the computer, the hyperlink in the Microsoft Word failed with the "This operation has been cancelled due to restrictions in effect on this computer. Please contact your system administrator" error. Please right-click on the (Default) name and select Modify. Kindly change the (Default) value data fromchromefileto htmlfile. - Please close the Registry Editor and restart the computer. The hyperlink in Microsoft Word will work because the Internet Explorer will open and browse to that hyperlink that you have clicked in Microsoft Word.
Reference
[1] This operation has been cancelled due to restrictions in effect
Sunday, September 9, 2012
Bad experience on Fuji Xerox DocuPrint M205b Multifunction printer (Rev: 1.1)
First time bought a Fuji Xerox DocuPrint M205b Multifunction printer (S$169). The Fuji Xerox DocuPrint M205b printer (supports USB 2.0 only) is connected to the Dell Optiplex GX270 computer (running Windows XP Professional SP3 Operating System) rear USB port that supports USB 2.0. When printing a test page locally, the “Print” button on the printer will briefly light up and the printer panel will show a “cancelling…” message, and nothing print out.
The Copying and Scanning functions of the Fuji Xerox DocuPrint M205b Multifunction printer work fine. Reinstalled the printer drivers from the printer CDROM, or updated the printer Graphics Device Interface (GDI) print drivers to a newer version 1.007 that is downloaded from Fuji Xerox Support website, or updated the printer MCU Firmware to a newer version 2.16 or changing the printer USB cable still encountered the same “cancelling…” error.
After checking with the Fuji Xerox Technical Support by phone, it was known that the 4 years warranty (2 years standard + 2 years limited carry-in warranty) are actually all carry-in warranty. The Fuji Xerox technical support lady did not give much technical advices except that we sent the Fuji Xerox DocuPrint M205b printer to their Fuji Xerox Customer Care Centre for checking. Never expect a new delivered printer to have such printing problem where we need to hand-carry the new printer (8.9 kg) immediately for servicing repair at Fuji Xerox Customer Care Centre, or pay S$40.00 (transportation charge) for on-site printer servicing.
[JackNg, updated 13 Sept 2012]
After trying all the 6 rear USB ports and 1 front USB port of the Dell Optiplex GX270 computer, the "cancelling…" error still existed and cannot be solved. In the end, I connected the Fuji Xerox DocuPrint M205b printer to a Dell Optiplex GX620 computer (also running Windows XP Professional SP3 Operating System) rear USB port that also supports USB 2.0. I performed a fresh installation of the Fuji Xerox DocuPrint M205b printer drivers from the printer CDROM at the Dell Optiplex GX620 computer. After restarting the computer, the Fuji Xerox DocuPrint M205b printer print normally and the "cancelling…" error was solved in the Dell Optiplex GX620 computer.
The main different of the Dell Optiplex GX270 and Optiplex GX620 computers are the USB Controllers in the Device Manager. Dell Optiplex GX270 computer shown a "Standard Enhanced PCI to USB Host Controller" while the Dell Optiplex GX620 computer shown a "Intel 82801EB USB2 Enhanced Host Controller - 24DD". As connecting an external USB hardisk to both Dell Optiplex GX270 and Optiplex GX620 computers have no connection error, I suspected the Fuji Xerox DocuPrint M205b printer “cancelling…” error was caused by the different in the USB Controllers.
Wednesday, September 5, 2012
Solved Security Update for Microsoft InfoPath 2010 (KB2553322) 32-Bit Edition failed to install error (Rev: 1.0)
In the Windows XP Professional SP3 Operating System (OS) computer, Microsoft Office Professional Plus 2010 SP1 software included the Microsoft InfoPath Designer 2010 software [version 14.0.6123.5001 (32 bit)]. The Security Update for Microsoft InfoPath 2010 (KB2553322) 32-Bit Edition patch failed to install in the Windows XP OS. Windows XP OS will repeatedly prompt you to install the Security Update for Microsoft InfoPath 2010 (KB2553322) 32-Bit Edition patch again.
If we surf the Microsoft Windows Update website using Internet Explorer browser and click the "Review your update history" on the Left Hand Side (LHS) of the webpage, the Security Update for Microsoft InfoPath 2010 (KB2553322) 32-Bit Edition "Failed Status" indicated that the installation failure had an Error Code: 0x80070652.
If we view the C:\WINDOWS\WindowsUpdate.log, under the "AU received handle event" for "Title = Security Update for Microsoft InfoPath 2010 (KB2553322) 32-Bit Edition", the error "a34 Handler : WARNING: First failure for update {BE1DF1D8-B6BB-497A-8A3F-9EA5D58B6CAE}, transaction error = 0x8024200b, MSI result = 0x80070643, MSI action = WriteRegistryValues" seems to be related to the registry writing error. The lines "41c AU # WARNING: Install failed, error = 0x80070643 / 0x0000057A" seems to indicate that the error codes are 0x80070643 or 0x0000057A.
Solutions
- In the Windows XP OS, please go to "Start" -> "Control Panel" -> "Add or Remove Programs" and uninstalled the "Microsoft Office 2010 Language Pack for Chinese Simplified 32 bit". Exit from the "Add or Remove Programs" once the "Microsoft Office 2010 Language Pack for Chinese Simplified 32 bit" was uninstalled.
- Without rebooting the computer, please install the Security Update for Microsoft InfoPath 2010 (KB2553322) 32-Bit Edition patch. This time, the patch installation is successful.
Monday, August 13, 2012
Solved changing Microsoft Office 2010 from Chinese user interface to English user interface without reinstalling Microsoft Office 2010 in Windows XP x86 OS (Rev: 1.0)
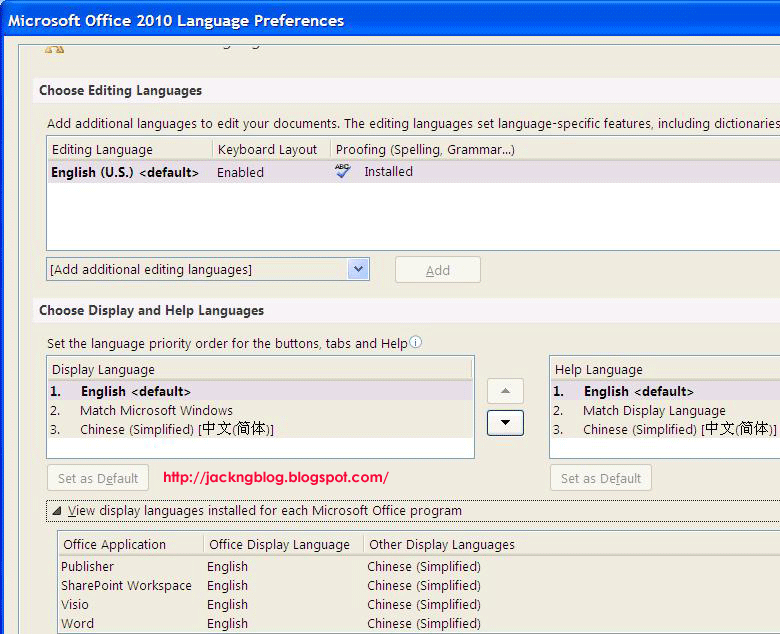
For BENQ JoyBook S42 notebook with Windows XP Professional SP3 x86 Operating System (OS), the Microsoft Office 2010 default Display Language and Help Language are shown as Chinese language. Although the Windows XP Professional SP3 OS default input language was already set as English (United States) language, the Microsoft Office 2010 default Display Language was set to match the Microsoft Windows interface language (English), and the default Help Language was set to match the display language (English), the Microsoft Office 2010 user interface is still Chinese language as shown below:

Solution to change Microsoft Office 2010 from Chinese user interface to English user interface without reinstalling Microsoft Office 2010
- You will need to buy an Microsoft Office 2010 English Language Packs (S$32.55), or you can download the various Microsoft Office 2010 Language Packs from "My Digital Life: Office 2010 Language Packs (version 14.0.4730.1010) Free Official Direct Download Links".
- Assume you have already downloaded the "Microsoft Office 2010 English Language Pack 32-bit (x86): X16-37701.exe" (435,987,576 bytes). Kindly double-click the X16-37701.exe to install the Microsoft Office 2010 English Language Pack 32-bit. At the "Select a Microsoft Office Product" window, please select "Microsoft Office Language Pack 2010 - English" and click the "Continue" button. Kindly accept the Microsoft License Agreement and click the "Install Now" button to start the installation.
- After the installation has completed, in Windows XP OS, please go to Start -> All Programs -> Microsoft Office -> Microsoft Office 2010 Tools -> Microsoft Office 2010 Language Preferences. Please set the default Display Language and Help Language as English. You will be prompt the below:
Microsoft Office 2010 Language Preferences Change
You have changed your language preferences. For these changes to take effect, you must restart Office. Save your work, and then close all Microsoft Office programs. - Kindly save your work and restart Microsoft Office 2010. Your Microsoft Office 2010 user interface (excluding Microsoft Visio 2010) had successfully changed from Chinese to English language user interface as shown below:
- (optional) If you have also installed Microsoft Visio 2010, please repeat step 2 except that at the "Select a Microsoft Office Product" window, please select "Microsoft Visio Language Pack 2010 - English". Kindly click the "Continue" button and accept the Microsoft License Agreement. Click the "Install Now" button to start the installation for Microsoft Visio Language Pack 2010 - English. After the installation had completed, the Microsoft Visio 2010 user interface will change from Chinese to English language user interface.
Monday, August 6, 2012
Solved changing SATA operation mode in BIOS from IDE to AHCI without reinstalling Windows XP x64 OS for ASUS P8H77-M motherboard (Rev: 1.0)
Before the Windows XP x64 Operating System (OS) installation process on Asus P8H77-M motherboard computer that has Intel H77 Express Chipset, the SATA configuration mode in the BIOS by default is set to IDE and not RAID/AHCI. Hence, the RAID/AHCI drivers are not loaded during the Windows XP x64 OS installation process.
After installing the Windows XP x64 OS, I have failed to install the Intel Rapid Storage Technology Driver software v11.1.0.1006 (under SATA category) for Windows XP 32/64 bit & Win7 32/64 bit (WHQL). If I set the BIOS SATA configuration mode from IDE to AHCI (Advanced Host Controller Interface), the computer will get a blue screen "STOP 0x0000007B" error during bootup because the Windows XP x64 OS failed to load the AHCI drivers to detect the Seagate 2 TB SATA3 hardisk.
Solutions to change SATA operation mode in BIOS from IDE to AHCI without reinstalling Windows XP x64 OS for ASUS P8H77-M motherboard
- Please download iaStor_64bit_forAHCI_WinXPSP2x64.rar and also the Intel Rapid Storage Technology Driver software v11.1.0.1006 for Windows XP 32/64bit & Win7 32/64bit (WHQL) from Asus website.
[iaStor_64bit_forAHCI_WinXPSP2x64.rar MD5 checksum: 83c42559d0ca79bc4290a305c2f39c88]
Files inside the iaStor_64bit_forAHCI_WinXPSP2x64.rar:- iaStor.sys (568, 600 bytes, v11.1.0.1006, 64 bit driver)
The iaStor.sys is from the Asus P8H77-M motherboard download site, under SATA category for Intel Rapid Storage Technology Driver software v11.1.0.1006 (Intel_Rapid_V11101006_XPWin7.zip) for Windows XP 32/64bit & Win7 32/64bit (WHQL). After unzip the Intel_Rapid_V11101006_XPWin7.zip file, the iaStor.sys is under the \Driver\64bit directory.
- ASUS P8H77-M_AHCI_HKLM_CCS_iaStor.reg file:
Windows Registry Editor Version 5.00
[HKEY_LOCAL_MACHINE\SYSTEM\CurrentControlSet\services\iaStor]
"Type"=dword:00000001
"Start"=dword:00000000
"ErrorControl"=dword:00000001
"Tag"=dword:00000019
"ImagePath"="system32\\drivers\\iaStor.sys"
"DisplayName"="Intel AHCI Controller"
"Group"="SCSI Miniport"
[HKEY_LOCAL_MACHINE\SYSTEM\CurrentControlSet\services\iaStor\Parameters]
"BusType"=dword:00000003
[HKEY_LOCAL_MACHINE\SYSTEM\CurrentControlSet\services\iaStor\Enum]
"0"="PCI\\VEN_8086&DEV_1E02&SUBSYS_84CA1043&REV_04\\3&11583659&0&FA"
"Count"=dword:00000001
"NextInstance"=dword:00000001 - ASUS P8H77-M_AHCI_HKLM_CS001_iaStor.reg file:
Windows Registry Editor Version 5.00
[HKEY_LOCAL_MACHINE\SYSTEM\ControlSet001\Control\CriticalDeviceDatabase\pci#ven_8086&dev_1e02&cc_0106]
"Service"="iaStor"
"ClassGUID"="{4d36e96a-e325-11ce-bfc1-08002be10318}"
- iaStor.sys (568, 600 bytes, v11.1.0.1006, 64 bit driver)
- In Windows XP x64 environment, please copy the iaStor.sys to the C:\WINDOWS\system32\drivers directory. Then, kindly right-click on ASUS P8H77-M_AHCI_HKLM_CCS_iaStor.reg and click "Merge" to add the registry to the Windows XP x64 OS. Please also right-click on ASUS P8H77-M_AHCI_HKLM_CS001_iaStor.reg and click "Merge" to add the registry to the Windows XP x64 OS. Please restart the computer and go to BIOS (DO NOT allow the Windows XP x64 OS to start the bootup process).
- During computer bootup, I pressed [DELETE] to enter BIOS. In BIOS, I clicked Advanced Mode -> Advanced -> SATA Configuration -> SATA Mode Selection and changed the SATA Mode from IDE to AHCI. I pressed [F10] to save the configuration and reset the BIOS. The Windows XP x64 OS boot up successfully without the blue screen "STOP 0x0000007B" error.
- I login to Windows XP x64 OS. Windows XP x64 OS will automatically shown a wizard to install the new detected hardware drivers. I cancel the wizard. I opened a Windows Explorer, go to the extracted directory of Intel Rapid Storage Technology Driver software v11.1.0.1006 and double-click the setup.exe to install the Intel Rapid Storage Technology Driver software v11.1.0.1006. Once the installation is successfully, it will prompt me to restart the computer to apply these changes. I clicked the "Finish" button to restart the computer.
- I login to Windows XP x64 OS. Under the Device Manager -> IDE ATA/ATAPI controllers, you will see an Intel(R) 7 Series/C216 Chipset Family SATA AHCI Controller.
Reference
[1] HOWTO: enable AHCI mode after installing Windows
Monday, July 30, 2012
Solved unknown devices in Windows 7 (x64) OS on computer with Asus P8H77-M motherboard (Rev: 1.4)
After installing Windows 7 (x64) Operating System (OS) on computer with Asus P8H77-M motherboard [Intel Core i5-3470 (3.2 Ghz) CPU, Corsair Vengeance 16 GB DDR3 1600 Mhz memory, etc], there are a few unknown devices in the Control Panel -> System -> Device Manager as shown below:
- Ethernet Controller
-> Installing the device drivers under LAN -> Realtek LAN Driver v7.52.203.2012 for Windows 7 (32bit & 64bit) (WHQL). [Download] - PCI Simple Communications Controller
-> Installing the device drivers under Utilities -> Management Engine Interface v8.0.0.1262 for Windows XP 64bit & Windows 7 64bit. [Download] - SM Bus Controller
-> Installing the device drivers under Chipset -> Intel Chipset Driver v9.3.0.1019 for Windows 7 64bit (WHQL). [Download]
- Standard VGA Graphics Adapter
-> Installing the device drivers under VGA -> Intel Graphics Accelerator Driver v8.15.10.2669 for Windows 7 64bit (WHQL). The Intel Graphics Accelerator Driver from Asustek is better than the Microsoft Standard VGA Graphics Adapter generic device drivers. [Download]
Before installing the Intel Graphics Accelerator Driver, you will need to install the Microsoft .NET Framework v3.5 Service Pack 1 or higher version first. After installing the Intel Graphics Accelerator Driver v8.15.10.2669, the Windows 7 x64 OS has a newer update Intel Graphics Accelerator Driver from Microsoft Update. Anyway, just install it. - Universal Serial Bus (USB) Controller
-> Installing the device drivers under USB -> Intel USB 3.0 Driver v1.0.4.220 for Windows 7 (32bit & 64bit) (WHQL). [Download]
If your OS is Windows XP (x86 or x64), you cannot installed this Intel USB 3.0 Driver because it is not supported by the Asus P8H77-M motherboard. Please refer to the P8Z77 or P8H77 Series Windows OS Limitation Notices for more information.
- Unknown (Hardware Ids: ACPI\INT33A0)
-> Installing the device drivers under Utilities -> Intel Smart Connect Technology v2.0.1083.0 for Windows 7 (32bit & 64bit). [Download]
In the BIOS Advanced Mode, I clicked the "Advanced" -> "PCH Configuration" -> "Intel(R) Smart Connect Technology" -> "ISCT Configuration" and set it to "Enabled".
Update BIOS file using the BIOS built-in Asus EZ Flash 2 Utility
I have also updated the Asus P8H77-M motherboard BIOS from version 0403 to 0514 to improve system stability and also to enhance compatibility with some USB devices. After downloaded the BIOS update file "P8H77-M-ASUS-0514.zip", I unzip it and saved the P8H77-M-ASUS-0514.CAP file at d:\ drive. Then, I reboot the computer and press [DELETE] key to enter the BIOS. In the BIOS Advanced Mode, I clicked "Tool" -> "Asus EZ Flash 2 Utility". I navigate to the hardisk that contains the d:\P8H77-M-ASUS-0514.CAP and performed the BIOS update process of the P8H77-M-ASUS-0514.CAP within the BIOS. I reboot the computer when the BIOS update process is done.
Manually set Corsair Vengeance DDR3 1600 Mhz memory to run at 1600 Mhz in BIOS
The Asus P8H77-M motherboard BIOS by default will auto detect the Corsair Vengeance 16 GB DDR3 1600 Mhz memory to run at 1333 Mhz speed. In the BIOS Advanced Mode, I clicked the "Ai Tweaker" -> "Memory Frequency", and manually set the memory speed from "Auto" to "DDR3-1600Mhz".
Trusted Platform Module (TPM) support
The Asus P8H77-M motherboard indicates that it support TPM. However, when trying to install the Infineon TPM Professional Driver v3.6.000 for the Windows 7 64bit OS, an error on "Cannot find
the Trust Platform Module" occurred and the installation failed. From the Asus Technical Support, the Asus P8H77-M motherboard only has TPM pins. We need to purchase the TPM module individually if we want to have TPM support.
Problems encountered & solutions
According to the Asus P8H77-M motherboard manual page 1-41 (53 of 96) on "System Requirements for Intel 2012 Desktop responsiveness technologies" for Intel Smart Response Technology, Intel Rapid Start Technology and Intel Smart Connect Technology, the below requirement must be meet:
- CPU: Intel 3rd/2nd generation Core Processor family
- OS: Windows 7 Operating System (OS)
- SSD: One dedicated Solid State Disk (SSD) to support Intel Smart Response (SATA mode must be set as RAID) and Intel Rapid Start Technology is necessary.
- HDD: At least one Hard Disk Drive (HDD) for the system OS drive.
- DRAM: To enable Intel Rapid Start Technology, DRAM size smaller than 8 GB is required.
Intel Smart Response Technology
The Intel Smart Response Technology boosts overall system performance by using an installed fast SSD (minimum 20GB caching size and maximum 64GB caching size) as a cache for frequently accessed operations.
Intel Rapid Start Technology
The Intel Rapid Start Technology allows you to quickly resume your computer from sleeping mode because it saves your computer’s system memory to the configured SSD. Before applying Intel Rapid Start Technology, please go to BIOS -> Advanced Mode -> Advanced -> PCH Configuration -> enable (Intel Rapid Start Technology). You will also need to create a partition (required partition size = System DRAM memory) precisely to enable the Intel Rapid Start Technology.
Intel Smart Connect Technology
The Intel Smart Connect Technology provides the latest content updates and energy efficiency to your computer’s platform. The Intel Smart Connect Technology periodically wakes up the computer from sleeping mode, performs user state gathering and initiates re-entry to sleeping mode to wake-up after a set time interval. Intel Smart Connect Technology supports Windows Live Mail, Microsoft Outlook and Seesmic applications. Before applying Intel Smart Connect Technology, please go to BIOS -> Advanced Mode -> Advanced -> PCH Configuration -> enable (Intel Smart Connect Technology).
Solved cannot install Intel RAID/AHCI Drivers error in Windows 7 x64 OS
When trying to install the Intel RAID features or the Advanced Host Controller Interface (AHCI) Drivers v11.0.0.1032 for Windows XP 64bit & Windows 7 64bit (WHQL), an error on "This system does not meet the minimum software requirement" appeared because there is no 2.5” SATA Solid State Drive (SSD), and the 16 GB computer memory is not suitable for the Intel Rapid Start Technology requirement of DRAM size smaller than 8 GB. Hence, I failed to install the RAID/AHCI Driver using the setup.exe.
I have also failed to install the 64 bits AHCI drivers alone (without using the setup.exe) in Windows 7 x64 OS. Before the Windows 7 x64 OS installation process, the SATA configuration mode in the BIOS by default is set to IDE and not RAID/AHCI. Hence, the RAID/AHCI drivers are not loaded during the Windows 7 x64 OS installation process.
When the Windows 7 x64 installation is completed, any unused storage drivers (eg: RAID/AHCI drivers) are disabled by Windows 7 OS. This behavior speeds up the Windows 7 operating system's startup process. If I set the BIOS SATA configuration mode from IDE to AHCI, the computer will get a blue screen "STOP 0x0000007B" error during Windows 7 x64 OS bootup because the AHCI drivers are disabled by Windows 7 OS.
Solutions
When you change the boot drive (c:\ drive with Windows 7 x64 OS) to a driver that has been disabled (eg: AHCI drivers), you must enable the new driver (eg: Standard AHCI 1.0 Serial ATA Controller drivers from Microsoft) before you change the hardware configuration.
1. I have ran registry editor, regedt32 to edit the below 2 registries:
- HKEY_LOCAL_MACHINE\System\CurrentControlSet\Services\Msahci
-> right-click on "Start" in the "Name" column, then click "Modify" and change the default value from 3 to 0 (zero, not capital letter O). - HKEY_LOCAL_MACHINE\System\CurrentControlSet\Services\iaStorV
-> right-click on "Start" in the "Name" column, then click "Modify" and change the default value from 3 to 0 (zero, not capital letter O).
2. During computer bootup, I pressed [DELETE] to enter BIOS. In BIOS, I clicked Advanced Mode -> Advanced -> SATA Configuration -> SATA Mode Selection and changed the SATA Mode from IDE to AHCI. I pressed [F10] to save the configuration and reset the BIOS. The Windows 7 x64 OS boot up successfully without the blue screen "STOP 0x0000007B" error.
3. I login to Windows 7 x64 OS. Windows 7 x64 OS will automatically installed the Microsoft Standard AHCI 1.0 Serial ATA Controller drivers. Once the installation is successfully, it will prompt me to restart the computer to apply these changes. I click "Restart Now" to restart the computer.
4. I login to Windows 7 x64 OS. I go to Device Manager -> IDE ATA/ATAPI controllers. I click to select the Standard AHCI 1.0 Serial ATA Controller, then right-click & select the "Update Driver software". I pointed the update drivers to the Asus Intel RAID/AHCI Driver v11.1.0.1006 for Windows XP 64bit & Windows 7 64bit (WHQL) (extract it and the AHCI 64 bits drivers are under the \Drivers\64bit directory) drivers. Windows 7 x64 OS will installed the Asus update drivers, Intel(R) 7 Series/C216 Chipset Family SATA AHCI Controller. Once Windows 7 x64 OS has successfully update the AHCI drivers from Microsoft Standard AHCI 1.0 Serial ATA Controller to Intel(R) 7 Series/C216 Chipset Family SATA AHCI Controller, it will prompt that the hardware that you have installed will not work until you restart your computer. I restart the computer.
5. I login to Windows 7 x64 OS. Windows 7 x64 OS will automatically prompt you to restart your computer to apply these changes. I restart the computer.
6. I login to Windows 7 x64 OS and activate the Windows 7 x64 OS online again.
Asus P8H77-M motherboard USB 3.0 connector for front panel failed to work properly
The computer has an Antec 520W power supply and is using the built-in Intel HD Graphic 2500 port, and has only 1 Seagate 2 TB SATA3 HDD and a SATA DVD drive. Since the Asus P8H77-M motherboard supports 2 x USB 3.0/2.0 ports at mid-board (20-1 pin USB3_34) for front panel support, a CoolerMaster RA-USB-3035-IN 3.5" USB 3.0 adapter is connected to the motherboard 20-1 pin USB3_34 and used as a front panel USB 3.0 ports.
When connecting a Seagate FreeAgent Goflex 1 TB external USB 3.0 hardisk (without any power adapter) to the CoolerMaster RA-USB-3035-IN 3.5" USB 3.0 adapter in Windows 7 x64 OS, the USB 3.0 connection is not stable (connection will auto cut off by itself, then auto connect, then auto cut off again after a few seconds).
When connecting a Western Digital MyBook Essential external 3 TB hardisk (with a power adapter) to the CoolerMaster RA-USB-3035-IN 3.5" USB 3.0 adapter in the Windows 7 x64 OS, a pop up saying that "This device can perform faster if you connect it to a super speed USB 3.0 port" and it can only run at USB 2.0 speed.
If I connect these 2 hardisk to the rear USB 3.0 ports, the USB 3.0 connection can runs at USB 3.0 speed [5 Gbits per second (Gbps)] and is stable. The Asus P8H77-M motherboard USB 3.0 connector (20-1 pin USB3_34) failed to work as expected. From Asus Support feedback, the front panel USB 3.0 ports may not has enough power to run the Seagate FreeAgent Goflex 1 TB external USB3.0 hardisk (without any power adapter). Hence, it is advisable to use hardisk that came with its own external power adapter when using the front USB 3.0 ports.
WD Universal Firmware Updater for Windows
Western Digital (WD) provides My Book Essential (USB 3.0) firmware release 3.1.0.11B update for Windows users. The WD (Windows) Universal Firmware Updater Release Notes for v3.1.0.11B indicates that it will fixed incompatibility with Intel USB 3.0 host controllers. Before updating the WD My Book Essential (USB 3.0) hardisk firmware, all AntiVirus and Anti-Spyware software MUST be disabled. Your WD My Book Essential (USB 3.0) hardisk MUST be connected to your computer through the USB port to update the firmware through an internet connection that will download the latest firmware from the WD website and update the hardisk firmware. Please connect your WD My Book Essential (USB 3.0) hardisk to the USB 2.0 port on your computer for the firmware update process. When I connected the WD MyBook Essential external 3 TB hardisk to the USB 3.0 port, the My Book Essential (USB 3.0) firmware update software, WDFirmwareUpdater.exe failed to auto detect the hardisk and go to the next updating stage of downloading the required update modules.
The Seagate FreeAgent Goflex 1 TB external USB 3.0 hardisk has no firmware update available. Please refer to "Firmware Updates for Seagate Products" for more information.
References
[1] Asus P8H77-M motherboard User Manual version E7313
[2] Error message when you start a Windows 7 or Windows Vista-based computer after you change the SATA mode of the boot drive: "STOP 0x0000007B INACCESSABLE_BOOT_DEVICE"
[3] My Book Essential (USB 3.0) firmware release 3.1.0.11B update for Windows users
Subscribe to:
Comments (Atom)