Tuesday, August 19, 2008

Series RL circuit (Rev: 1.3)


Inductor voltage and current waveforms
Diagram 1: Inductor voltage (VL) and current (I) waveforms


In a pure inductor, current flows across the inductor lags the inductor voltage (VL) by 90 degree (diagram 1). In another words, inductor voltage (VL) leads the current by 90 degree (diagram 1). This is because when the voltage is applied to an inductor, the back ElectroMotive Force (EMF) [Lenz's law] resists current build up in the inductor, causing the inductor current (IL) to lag in time and phase than the inductor voltage (VL). The reactance of an inductor (XL) is the result of the inductor producing a back EMF which opposes change in the current.


Series RL circuit
Diagram 2: Series RL circuit (assume pure inductor)


Digital Storage Oscilloscope (DSO) measures and displays AC and DC voltages signals over a wide range of frequencies. DSO does not measures current. When using the DSO to plot the inductor voltage (VL) and resistor voltage (VR) on a series RL circuit (diagram 2) with a constant current, we can conclude the relationship of the phase of current to the inductor voltage (VL) and resistor voltage (VR) by using the phasor diagram.


Phasor diagram

Series RL circuit phasor diagram
Diagram 3: Phasor diagram of a series RL circuit (assume pure inductor)


According to Kirchoff's current law, the current at any given instant in a series circuit must be the same throughout all parts of the circuit. Therefore, total current (IT) = resistor current (IR) = inductor current (IL) as shown in the phasor diagram (diagram 3) of a series RL circuit (diagram 2).

Since current is the only quantity which is common to all parts of a series circuit, it is used as a reference for zero phase (positive x-axis) to show the phase relationships between currents and voltages.

Since the resistor current (IR) and resistor voltage (VR) are in phase (zero phase), the resistor voltage (VR) phasor will be on the same line on the positive x-axis. As the inductor voltage (VL) leads the current by 90 degree (assume pure inductor), the inductor voltage phase is a positive 90 degree.


References:

[1] Phase relationships in AC circuits

[2] Wikipedia

[3] Basic electricity and electronics (By Charles A. Schuler and Richard J. Fowler)

Series RC circuit (Rev: 1.41)


Capacitor voltage and current waveforms
Diagram 1: Capacitor voltage (VC) and current (I) waveforms


In a capacitor, current (I) flows across the capacitor leads the capacitor voltage (VC) by 90 degree (diagram 1). In another words, capacitor voltage (VC) lags the current (I) by 90 degree (diagram 1). This is because the voltage on a capacitor is directly proportional to the charge in the capacitor plates. The current must lead the voltage in time and phase in order to build up the charge in the capacitor plates and raise the capacitor voltage. This is proved in the series RC circuit (diagram 2) voltage waveforms (diagram 3).


Series RC circuit
Diagram 2: Series RC circuit


Series RC circuit at 1 Khz
Diagram 3: Series RC circuit voltage waveforms


Digital Storage Oscilloscope (DSO) measures and displays AC and DC voltages signals over a wide range of frequencies. DSO does not measures current. When using the DSO to plot the capacitor voltage (VC) and resistor voltage (VR) on a series RC circuit (diagram 2) with a constant current, we can use the phasor diagram of a series RC circuit to conclude the relationship of the phase of current to the capacitor voltage (VC) and resistor voltage (VR).


Phasor diagram

Series RC circuit phasor diagram
Diagram 4: Phasor diagram of a series RC circuit


According to Kirchoff's current law, the current at any given instant in a series circuit must be the same throughout all parts of the circuit. Therefore, total current (IT) = resistor current (IR) = capacitor current (IC) as shown in the phasor diagram (diagram 4) of a series RC circuit (diagram 2).

Since current is the only quantity which is common to all parts of a series circuit, it is used as a reference for zero phase (positive x-axis) to show the phase relationships between currents and voltages.

Since the resistor current (IR) and resistor voltage (VR) are in phase (zero phase), the resistor voltage (VR) phasor will be on the same line on the positive x-axis. As the capacitor voltage (VC) lags the current by 90 degree, the capacitor voltage phase is a negative 90 degree.


Breadboard and DSO connection

It is not possible to measure directly the VR and VC values at the same time because they have different zero reference points or different grounds. To get VR, the "MATH" function of the DSO is used to subtract the signal at channel 2 (CH2) from the signal at channel 1 (CH1).

Series RC circuit: Probes of DSO
Diagram 5: Series RC circuit with channel probes of DSO

Series RC circuit: breadboard connection
Diagram 6: Connection of series RC circuit on the breadboard


References:

[1] Phase relationships in AC circuits

[2] Wikipedia

[3] Electronics-Tutorials

[4] Basic electricity and electronics (By Charles A. Schuler and Richard J. Fowler)

Thursday, August 14, 2008

Backup your emails to a Personal Folder File (Rev: 1.2)


If you are using Microsoft Outlook 2000/2002/2003/2007/2010 or higher version, you can create a Personal Folder File (.pst) in Microsoft Outlook and stores your emails into it. You can copy your Personal Folder File (.pst) to another computer/notebook for backup purpose. The Personal Folder File is limited by your hard disk capacity and not subject to the mailbox size limits on the server.

Microsoft Outlook can be configured to deliver new items to a .pst file, but doing so has several disadvantages including not being able to work with your items from other computers/notebooks or when using Microsoft Outlook Web Access with your Exchange e-mail account.


Creating a Personal Folder File in the Microsoft Outlook

1) For Microsoft Outlook 2000/2002/2003/2007, kindly click File > New > Outlook Data File.
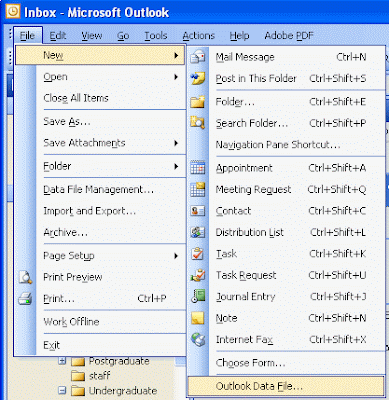
New data file
For Microsoft Outlook 2000/2002/2003/2007


For Microsoft Outlook 2010, kindly click File > New Items > More Items > Outlook Data File.
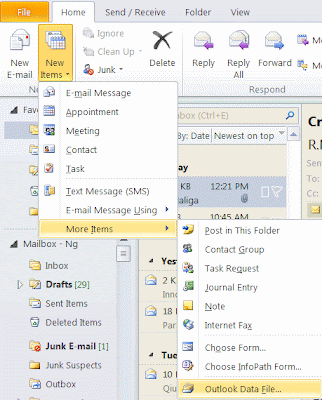
Outlook 2010_new Data File
For Microsoft Outlook 2010


2) Kindly select which types of .pst file you’d like to create and click OK. (This step is not available for Microsoft Outlook 2010)

Types of storage
For Microsoft Outlook 2000/2002/2003/2007


3) Kindly specify a directory that you want to save your .pst file, rename your filename accordingly and click OK. It is recommended that you create a folder in the D drive (not in C drive) and save your .pst file in it so that if you need to reinstall your operating system in the C drive, your data files in the D drive are still intact.
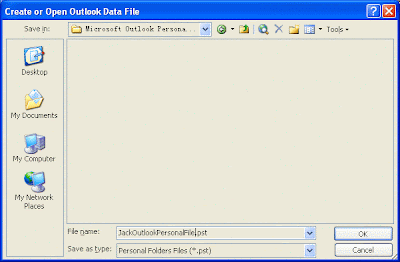
Directory to save
For Microsoft Outlook 2000/2002/2003/2007/2010
** Note **
The Personal Folders File are stored in your local drive, as specified by you. They do not reside in the Exchange Server. Therefore, you can only access those Personal Folders File on that computer whereby you stored them.


4) It is strongly recommended that you encrypted your Personal Folder File by giving it a password length of at least 8 combinations of letters, numbers, etc. Click the OK button after keying in your password.

In this example, I have created a Personal Folder File called Jack (JackOutlookPersonalFile.pst) and store it at
"d:\Microsoft Outlook Personal File" directory. Kindly take note of the directory path so that you can copy the Personal Folder File to another computer/notebook for backup purpose.
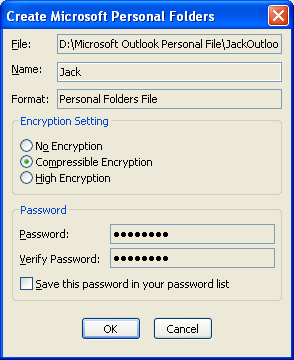
Encryption setting
For Microsoft Outlook 2000/2002/2003/2007


Moving your emails to your Personal Folder File

Simply drag and drop your emails from the Inbox to your created Personal Folder File. Press [CTRL] while dragging to copy emails instead of moving them.

It is recommended that you create different folders (Kindly select your Personal Folder File -> right click and select New Folders…) with different names and group your emails accordingly.
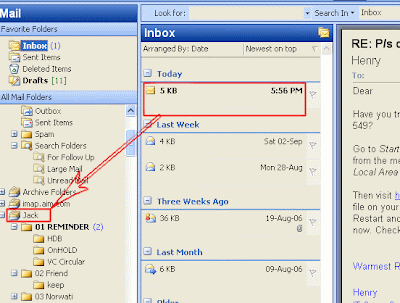
Move email to personal folder
** Note **
Upon transferring (moving) your emails to your Personal Folder File, they will no longer be available in your Inbox or the Mail Exchange Server. You can only access those emails from the Personal Folder File locally.


Create a rule based on a name or subject

Rule (or filters) refers to one or more automatic actions taken on e-mail messages that meet certain conditions, along with any exceptions to those conditions.


1) In the Microsoft Outlook Inbox, kindly select the message you want to base a rule on -> right click and select Create Rule….
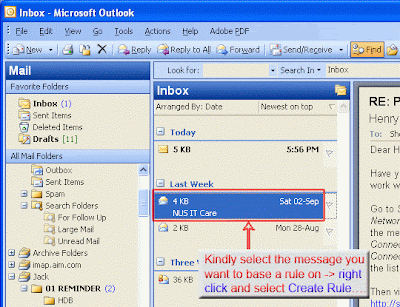
Add rules


2) In the Create Rule dialog box, kindly select the conditions and actions you want to apply and click OK.
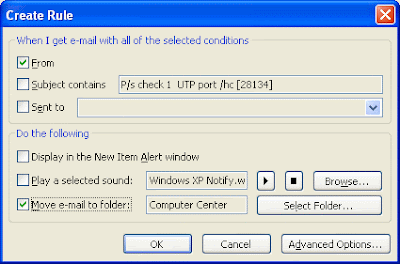
Creat eRule


3) To add more conditions, actions, or exceptions to the rule, click the Advanced Options…, and then follow the rest of the instructions in the Rules Wizard.


Q1) When I create a Personal Folder File and download the emails to it, the attachment of the older email which are stored in the Enterprise Vault cannot be downloaded to the Personal Folder File. Only a hyperlink is provided. Is there a way to overcome this problem ? Otherwise, the attachments will be lost when the email account is closed.

You will need to restore the emails from Enterprise Vault before moving them to the Personal Folder File. To do this, kindly open Microsoft Outlook and select the emails you want to move from the Enterprise Vault to the Personal Folder File. Then, in Microsoft Outlook, kindly click Tools > Enterprise Vault > Restore from Vault.

Once the restoration is finished, you can move those emails to your Personal Folder File.


Reference:

[1] Microsoft Office

Monday, August 11, 2008

Remove unwanted Solaris packages (Rev: 1.1)


After installing a full Solaris 10 5/2008 operating system (SPARC) with OEM support packages to the SUN Fire 280R server, I created a simple script (jrmpkg) to remove those packages that I did not want to free up hardisk space. You can copy and paste the below jrmpkg codes, and save it as any filename at your Solaris 10 machine. Modify the codes as you wish before running it.

------------- BEGIN jrmpkg codes -----------------------

#!/bin/csh
# Jack, Aug 2008, Rev: 1.0
# Remove unwanted packages for Solaris 10 5/2008

# Russian 1251 fonts
pkgrm -v SUNW1251f

# Apache common logging
pkgrm -v SUNWaclg
# Apache Web Server
pkgrm -v SUNWapch2d #V2 Documentation
pkgrm -v SUNWapch2r #V2 root
pkgrm -v SUNWapch2u #V2 usr
pkgrm -v SUNWapchd #Documentation
pkgrm -v SUNWapchr #root
pkgrm -v SUNWapchu #usr

# Boot server daemons
pkgrm -v SUNWbsr #root
pkgrm -v SUNWbsu #usr

# Solaris Diskless Client Management Application
pkgrm -v SUNWdclnt

# DHCP
pkgrm -v SUNWdhcm # DHCP manager
# Binary file format data module for BOOTP/DHCP services
pkgrm -v SUNWdhcsb
pkgrm -v SUNWdhcsr # BOOTP/DHCP server services (ROOT)
pkgrm -v SUNWdhcsu # BOOTP/DHCP server services (USR)

# CDE demos
pkgrm -v SUNWdtdem

# FTP server
pkgrm -v SUNWftpr #root
pkgrm -v SUNWftpu #usr

# Gnome games
pkgrm -v SUNWgnome-games
pkgrm -v SUNWgnome-games-root #platform dependent files, / filesystem
pkgrm -v SUNWgnome-games-share #platform dependent files, /usr/share

# J2SDK 1.4 demo programs
pkgrm -v SUNWj3dmo

# JDK 5.0 demo programs (1.5.0_16)
pkgrm -v SUNWj5dmo

# A set of Java Demo Applications
# jdictionary, jdiskreport. jedit, jgraphpad and jspider
pkgrm -v SUNWjavaapps

# JavaHelp demos
pkgrm -v SUNWjhdem

# Japanese iconv modules for UTF-8
pkgrm -v SUNWjiu8
# Japanese required TrueType font
# Solaris 10 5/2008 did not has this package
pkgrm -v SUNWjxcft
# Japanese required Bitmap font
pkgrm -v SUNWjxmft

# Korean iconv modules for UTF-8
pkgrm -v SUNWkiu8
# Korean TrueType fonts
# Solaris 10 5/2008 did not has this package
pkgrm -v SUNWkttf
# Korean X windows platform required fonts
# Solaris 10 5/2008 did not has this package
pkgrm -v SUNWkxfnt
# Korean (UTF-8) X windows platform minimum required fonts
pkgrm -v SUNWkxmft

# Modular debugger demo source
pkgrm -v SUNWmdbdm

# Mozilla for Solaris
pkgrm -v SUNWmozapoc-adapter #Apoc adapter
pkgrm -v SUNWmozchat #Chatzilla
pkgrm -v SUNWmozdom-inspector #DOM inspector
pkgrm -v SUNWmozgm #GNOME integration
pkgrm -v SUNWmozilla #Web browser
pkgrm -v SUNWmozilla-devel #Web browser - developer files
pkgrm -v SUNWmozjs-debugger #Javascript debugger
pkgrm -v SUNWmozmail #Mail
pkgrm -v SUNWmoznspr #Netscape portable runtime
pkgrm -v SUNWmoznspr-devel #Netscape portable runtime - developer files
pkgrm -v SUNWmoznss #Network security services
pkgrm -v SUNWmoznss-devel #Network security services - developer files
pkgrm -v SUNWmozpsm #Personal security manager
pkgrm -v SUNWmozspell #Spelling checker
pkgrm -v SUNWthunderbird #Thunderbird email/newsgroup client

# OS demo source
pkgrm -v SUNWosdem

# Open source demo programs
pkgrm -v SUNWsfwdemo


echo Disable sendmail process before removing sendmail packages
/usr/sbin/svcadm disable svc:/network/smtp:sendmail
# Sendmail
pkgrm -v SUNWsndmr #root
pkgrm -v SUNWsndmu #usr

# Thai (UTF-8) iconv modules for UTF-8
pkgrm -v SUNWtiu8
# Thai X windows platform required fonts package
pkgrm -v SUNWtxfnt

# Telnet server
pkgrm -v SUNWtnetc #client
pkgrm -v SUNWtnetd #server daemon (usr)
pkgrm -v SUNWtnetr #server daemon (root)

# X window system demo programs
pkgrm -v SUNWxwdem
# X window system demo images
pkgrm -v SUNWxwdim

------------- END jrmpkg codes --------------------------


To check all the software packages installed in your machine and save it as a file calls pkg.txt,
# pkginfo > pkg.txt


Browse through the text file pkg.txt to see the installed software packages,
# more pkg.txt


To display software package (eg: SUNWgnome-games) information in long format,
# pkginfo -l SUNWgnome-games


Reference:

[1] Sun Microsystems Documentation

Thursday, August 7, 2008

Add a network printer (Rev: 1.3)


Assumptions:
  • Your computer/notebook is using Windows XP Operating System and you have already login to the NUS network (recommended) using wired connection. If you are using wireless connection (NUS), please login to the WebVPN first before trying to search for the remote print server in NUS.
  • The remote computer that acts as a print server and the shared printer are both power on.
  • Kindly ensure that your computer Local Area Connection Properties
    (Start -> Control Panel -> Network Connections -> Local Area Connection) has checked (selected) the below items:
    • Client for Microsoft Networks
    • File and printer Sharing for Microsoft Networks
      LAN Properties


Using drag and drop method
  1. In your computer/notebook, kindly click Start -> Printers and Faxes.

    Printers and Faxes

  2. Kindly click Start -> All Programs -> Accessories -> Windows Explorer to open a windows explorer window.

  3. At the Windows Explorer window Address bar, kindly types the dedicated print server name using the \\printServerName format and hit the [ENTER] key to start connecting to the remote print server.

    Add Printer Server Name

  4. After about 3 to 8 seconds (depending on your network connection speed), you should be able to see the share printer name of that dedicated print server. If not, kindly ensure that the remote print server is powered on and try to establish the connection again.

    Share Printer Name
    [JackNg, 8/8/2009 update: Simply double-click on the remote share printer name to install it to your computer. You can skip step 5.]

  5. Kindly select the share printer name, press and hold the right-click button and drag it to the “Printers and Faxes” window. Release the right-click button and click the "Install" option to start installing the printer drivers to your computer/notebook.

    Drag and Drop

  6. Kindly repeat step (1) to (5) to install other printers (if any) to your computer/notebook.
After you have connected to a shared printer on the network, you can use it as if it was attached to your computer/notebook.


Notes:

Before submitting your print job, please ensure that you have

  1. already login to the NUS network (recommended) using wired connection. If you are using wireless connection (NUS), please login to the WebVPN first before trying to search for the remote print server in NUS and
  2. the dedicated print server and the printer that connected to it are both power on.
This is because your print job is submitted from your computer/notebook to the dedicated remote print server through the NUS network. Upon receiving your print job request, the dedicated remote print server will send it to the printer that connected to it to begin printing.

Wednesday, August 6, 2008

Windows key shortcuts (Rev: 1.1)


If you are using Microsoft Windows Operating System with a Windows keyboard
Windows keyboard
(has a "Windows key"), you can use the below Windows key shortcuts:

Windows key (Show Start Menu)
Windows key + d (Minimize/Restore all windows)
Windows key + e (Open Windows Explorer)
Windows key + f (Open Windows Search)
Windows key+ L (Lock computer)
Windows key+ m (Minimize all windows)
Windows key+ r (Open Run dialog box)
Windows key+ u (Open Accessibility Utility)
Windows key + [Pause/Break] (Open System Properties dialog box)
Windows key + [F1] (Open Help & Support)


Reference:

[1] Keyboard shortcuts for Windows

Tuesday, August 5, 2008

Fixmbr, Backup your MBR using MBRwizard or MBRFix (Rev: 1.2)


Situation

I had a computer that used the GRUB boot loader to load either Fedora Core (FC) 5 or Windows XP Operating System (OS) during boot up. In Windows XP, I deleted the FC 5 partition to free up the hardisk space as I did not want to run the FC 5 anymore. During rebooting of the computer, the computer failed to load the Windows XP OS and it always stopped at the GRUB prompt.


Solution

The GRUB boot loader had installed itself as the master boot code to load the respective OS during the installation of FC 5. As I have deleted the FC 5 partition in Windows XP, the GRUB partition was deleted as well. Hence, the GRUB boot loader does not know how to load the OS because the GRUB files are deleted. We can perform the below steps to correct the Master Boot Record (MBR) problem using fixmbr:

  1. Boot the computer from the Windows XP installation CDROM. At the "Welcome To Setup screen" blue screen, kindly press r to run the Recovery Console.

  2. At the Recovery Console menu, kindly press the menu number to log on to your Windows OS. Please enter the administrator password if prompt.

  3. Assume that your Windows XP OS was installed at the C:\ drive. In the Recovery Console, kindly type fixmbr

    ** CAUTION **
    This computer appears to have a non-standard or invalid master boot record.
    FIXMBR may damage your partition tables if you proceed.
    This could cause all the partitions on the current hardisk to become inaccessible.
    If you are not having problems accessing your drive, do not continue.
    Are you sure you want to write a new MBR ? y
    -> Writing new master boot record on physical drive
    \Device\Hardisk0\Partition0.

    The new master boot record has been successfully written.


  4. Kindly type exit to quit from the Recovery Console and your computer will automatically reboot. Your computer should be able to boot to the Windows XP OS now.


Backup your MBR using MBRwizard or MBRFix

You can backup your MBR using
  • MBRwizard CommandLine
  • MBRFix
    • v1.0.9 for Windows NT/2000/XP/Server2003/Vista/PE
      MbrFix_v1.0.9.rar (including 1mbrfix.bat and 2mbrfix64.bat), 136100 bytes
      MbrFix_v1.0.9.rar md5 checksum: a5fe93bbaf37288f6c2fcec2fa23b895
    • v1.3.0.0 or higher version for Windows NT/2000/XP/Server2003/Vista/7/Server2008/PE

After downloading and unzipping the software, kindly open a Command Prompt window to run the software.

At the Command Prompt window, kindly type
mbrwiz /? or
mbrfix /?

to display the help page and license.


I have created a 1mbrwiz.cmd file (included inside MbrWiz_v1.53.rar) to run the MBRwizard. You can copy and paste the below 1mbrwiz.cmd codes, and save it as 1mbrwiz.cmd file at the same directory with the MBRWiz.exe file in order to run it.

------------- BEGIN 1mbrwiz.cmd codes -----------------------

@echo off

rem 1mbrwiz.cmd
rem To backup the MBR using MBRWiz.exe
rem Created by Jack, Rev: 1.0, August 2008

setlocal

%~d0
cd "%~dp0"

set MBRWIZFILE=mbrwiz.exe
if not exist %MBRWIZFILE% goto _ERROR1


:MENU
title MBRWizard Menu
set _choice=
cls
echo.
echo *********************************************
echo Please select which MBRWizard options to run
echo *********************************************
echo.
echo 1 List MBR entries
echo 2 Hides the Partition number
echo 3 Unhides the Partition number
echo 4 Activates the Partition
echo 5 De-activates the Partition number
echo 6 Deletes the partition
echo 7 Wipes the MBR or wipes the first 63 sectors of disk
echo 8 Saves the MBR to filename
echo 9 Reads and restores the Disk MBR from filename
echo 10 Shows contents of an existing MBR backup file
echo 11 Sort MBR Entries by disk location
echo.
echo Press [ENTER] to exit
echo.
echo.
set /p _choice="Enter choice number: "
echo.
if "%_choice%" == "" goto EXIT
cls
if "%_choice%" == "1" goto ListMBR
if "%_choice%" == "2" goto HidePartition
if "%_choice%" == "3" goto UnhidePartition
if "%_choice%" == "4" goto ActivatePartition
if "%_choice%" == "5" goto InactivatePartition
if "%_choice%" == "6" goto DeletePartition
if "%_choice%" == "7" goto WipeMBR
if "%_choice%" == "8" goto SaveMBR
if "%_choice%" == "9" goto RestoreMBR
if "%_choice%" == "10" goto ShowMBR
if "%_choice%" == "11" goto SortMBR


:ListMBR
title MBRWizard - List MBR entries
echo.
echo Running: mbrwiz.exe /list
echo.
mbrwiz.exe /list
echo.
goto EXIT


:HidePartition
title MBRWizard - Hides the Partition number
set DriveNumber=
set PartitionNumber=
echo.
echo Please enter the HDD to use ("0" for 1st, "1" for 2nd, ...)
echo.
echo Press [ENTER] to abort.
echo.
set /p DriveNumber="Enter drive number: "
if "%DriveNumber%" == "" goto EXIT
echo.
echo Please enter the partition ID to hide ("0" for 1st,
echo "1" for 2nd, ... or "*" for all).
echo.
echo Press [ENTER] to abort.
echo.
set /p PartitionNumber="Enter partition number to hide: "
if "%PartitionNumber%" == "" goto EXIT
echo.
cls
echo Running: mbrwiz.exe /disk=%DriveNumber% /hide=%PartitionNumber% /list
echo.
mbrwiz.exe /disk=%DriveNumber% /hide=%PartitionNumber% /list
if "%errorlevel%" == "0" goto SUCCESS
echo.
goto EXIT


:UnhidePartition
title MBRWizard - Unhides the Partition number
set DriveNumber=
set PartitionNumber=
echo.
echo Please enter the HDD to use ("0" for 1st, "1" for 2nd, ...)
echo.
echo Press [ENTER] to abort.
echo.
set /p DriveNumber="Enter drive number: "
if "%DriveNumber%" == "" goto EXIT
echo.
echo Please enter the partition ID to unhide ("0" for 1st,
echo "1" for 2nd, ...; "*" for all).
echo.
echo Press [ENTER] to abort.
echo.
set /p PartitionNumber="Enter partition number: "
if "%PartitionNumber%" == "" goto EXIT
echo.
cls
echo Running: mbrwiz.exe /disk=%DriveNumber% /unhide=%PartitionNumber% /list
echo.
mbrwiz.exe /disk=%DriveNumber% /unhide=%PartitionNumber% /list
if "%errorlevel%" == "0" goto SUCCESS
echo.
goto EXIT


:ActivatePartition
title MBRWizard - Activates the Partition
set DriveNumber=
set PartitionNumber=
echo.
echo Please enter the HDD to use ("0" for 1st, "1" for 2nd, ...)
echo If you do not know which HDD to choose,
please enter
echo 'bm' to call the bootmenu.
echo.
echo Press [ENTER] to abort.
echo.
set /p DriveNumber="Enter drive number: "
if "%DriveNumber%" == "" goto EXIT
if "%DriveNumber%" == "bm" goto BOOTMENU
echo.
echo Please enter the partition ID to activate ("0" for 1st, "1" for 2nd, ...).
echo.
echo Press [ENTER] to abort.
echo.
set /p PartitionNumber="Enter partition number: "
if "%PartitionNumber%" == "" goto EXIT
echo.
cls
echo Running: mbrwiz.exe /disk=%DriveNumber% /active=%PartitionNumber% /list
echo.
mbrwiz.exe /disk=%DriveNumber% /active=%PartitionNumber% /list
if "%errorlevel%" == "0" goto SUCCESS
echo.
goto EXIT


:InactivatePartition
title MBRWizard - De-activates the partition number
set DriveNumber=
set PartitionNumber=
echo.
echo Please enter the HDD to use ("0" for 1st, "1" for 2nd, ...)
echo.
echo Press [ENTER] to abort.
echo.
set /p DriveNumber="Enter drive number: "
if "%DriveNumber%" == "" goto EXIT
echo.
echo Please enter the partition ID to deactivate ("0" for 1st,
echo "1" for 2nd, ...; "*" for all).
echo.
echo Press [ENTER] to abort.
echo.
set /p PartitionNumber="Enter partition number: "
if "%PartitionNumber%" == "" goto EXIT
echo.
cls
echo Running: mbrwiz.exe /disk=%DriveNumber% /inactive=%PartitionNumber% /list
echo.
mbrwiz.exe /disk=%DriveNumber% /inactive=%PartitionNumber% /list
if "%errorlevel%" == "0" goto SUCCESS
echo.
goto EXIT


:DeletePartition
title MBRWizard - Deletes the partition
set DriveNumber=
set PartitionNumber=
echo.
echo Please enter the HDD to use ("0" for 1st, "1" for 2nd, ...)
echo.
echo Press [ENTER] to abort.
echo.
set /p DriveNumber="Enter drive number: "
if "%DriveNumber%" == "" goto EXIT
echo.
echo Please enter the partition ID to delete ("0" for 1st, "1" for 2nd, ...).
echo.
echo Press [ENTER] to abort.
echo.
set /p PartitionNumber="Enter partition number: "
if "%PartitionNumber%" == "" goto EXIT
echo.
cls
echo Running: mbrwiz.exe /disk=%DriveNumber% /del=%PartitionNumber% /list
echo.
mbrwiz.exe /disk=%DriveNumber% /del=%PartitionNumber% /list
goto EXIT


:WipeMBR
title MBRWizard - Wipes the MBR or wipes the first 63 sectors of disk
set DriveNumber=
set OPTION=
echo.
echo Please enter the HDD to use ("0" for 1st, "1" for 2nd, ...)
echo.
echo Press [ENTER] to abort.
echo.
set /p DriveNumber="Enter drive number: "
if "%DriveNumber%" == "" goto EXIT
echo.
echo Please enter "1" for wipes the MBR, "2" for wipes of first 63 sectors of disk.
echo.
echo Press [ENTER] to abort.
echo.
set /p OPTION="Enter option: "
if "%OPTION%" == "" goto EXIT
echo.
cls
echo Running: mbrwiz.exe /disk=%DriveNumber% /wipe=%OPTION% /list
echo.
mbrwiz.exe /disk=%DriveNumber% /wipe=%OPTION% /list
goto EXIT


:SaveMBR
title MBRWizard - Save the MBR to filename
set DriveNumber=
set Filename=
echo.
echo Please enter the HDD to use ("0" for 1st, "1" for 2nd, ...)
echo.
echo Press [ENTER] to abort.
echo.
set /p DriveNumber="Enter drive number: "
if "%DriveNumber%" == "" goto EXIT
echo.
echo Please enter filename to save (eg: hd0.mbr)
echo.
echo Press [ENTER] to abort.
echo.
set /p Filename="Enter filename: "
if "%Filename%" == "" goto EXIT
echo.
cls
echo Running: mbrwiz.exe /disk=%DriveNumber% /save=%Filename%
echo.
mbrwiz.exe /disk=%DriveNumber% /save=%Filename%
echo.
goto EXIT


:RestoreMBR
title MBRWizard - Reads and restores the Disk MBR from filename
set DriveNumber=
set Filename=
echo.
echo Please enter the HDD to use ("0" for 1st, "1" for 2nd, ...)
echo.
echo Press [ENTER] to abort.
echo.
set /p DriveNumber="Enter drive number: "
if "%DriveNumber%" == "" goto EXIT
echo.
echo Please enter filename to restore (eg: hd0.mbr)
echo.
echo Press [ENTER] to abort.
echo.
set /p Filename="Enter filename: "
if "%Filename%" == "" goto EXIT
echo.
cls
echo Running: mbrwiz.exe /disk=%DriveNumber% /restore=%Filename% /list
echo.
mbrwiz.exe /disk=%DriveNumber% /restore=%Filename% /list
echo.
goto EXIT


:ShowMBR
title MBRWizard - Shows contents of an existing MBR backup file
set Filename=
echo.
echo Please enter filename to display (eg: hd0.mbr)
echo.
echo Press [ENTER] to abort.
echo.
set /p Filename="Enter filename: "
if "%Filename%" == "" goto EXIT
echo.
cls
echo Running: mbrwiz.exe /showfile=%Filename%
echo.
mbrwiz.exe /showfile=%Filename%
goto EXIT


:SortMBR
title MBRWizard - Sort MBR Entries by disk location
echo.
echo Running: mbrwiz.exe /issorted /list
echo.
mbrwiz.exe /issorted /list
if "%errorlevel%" == "1" goto NotSort
echo The partition entries in the MBR are already sorted.
goto EXIT


:NotSort
set INPUT=
echo The partition entries in the MBR are not sorted.
echo Do you want MBRWizard to sort the partition entries ?
echo.
echo Press [ENTER] to abort.
echo.
set /p INPUT="Enter [y]es or [n]o: "
echo.
if /I "%INPUT%" == "" goto EXIT
if /I "%INPUT%" == "n" goto EXIT
cls
echo Running: mbrwiz.exe /sort /list
echo.
mbrwiz.exe /sort /list
if "%errorlevel%" == "0" goto SUCCESS
goto EXIT


:SUCCESS
echo Operation completed successfully.
echo.
goto EXIT


:EXIT
set _exit=
echo.
echo Do you want to exit MBRWiz ?
echo.
set /p _exit="Enter [y]es or [n]o: "
if /I "%_exit%" == "" goto EXIT
if /I "%_exit%" == "n" goto MENU
if /I "%_exit%" == "y" goto END


:BOOTMENU
cls
echo Running: mbrwiz.exe /bootmenu
echo.
mbrwiz.exe /bootmenu
echo.
if "%errorlevel%" == "0" goto SUCCESS
echo.
goto EXIT


:_ERROR1
echo.
echo ERROR: %MBRWIZFILE% file not found
echo Kindly check if you have downloaded the MBRWiz from
echo http://www.mbrwizard.com
goto END


:END
endlocal
------------- END 1mbrwiz.cmd codes --------------------------


References:

[1] MBRWizard Reference Guide

[2] "Operating System Not Found" or "Missing operating system" error message when you start your Windows XP-based computer