Sunday, May 8, 2011

Run Windows XP software in Microsoft Windows 7 XP Mode environment (Rev: 1.55)


Microsoft Windows 7 XP Mode environment uses Microsoft Windows Virtual PC technology to run those old Windows XP software seamlessly in Windows 7 Operating System (OS), and launch them from the Windows 7 desktop with just a single click.


Requirements to run Windows XP Mode with Windows Virtual PC in Windows 7 OS:

  • Support OS and minimum memory requirement for Windows XP Mode
    Windows XP Mode is only available for both 32 bit and 64 bit versions of Windows 7 Professional, Enterprise or Ultimate OS with at least 2 GB of memory (32 bits OS) or 3 GB of memory (64 bits OS).

  • Windows XP Mode hardisk space requirement
    2 GB for installing Windows XP Mode. Additional 15 GB of available hardisk space for a virtual Windows environment.


  • Windows Virtual PC processor requirement
    To use Windows Virtual PC (available for both 32 bit and 64 bit versions of Windows 7 Ultimate, Enterprise, Professional, Home Basic and Home Premium), your processor must support processor virtualization extensions such as Intel Virtualization Technology (VT), AMD-V or VIA VT. You might need to enable these processor extensions in the BIOS as this setting is often not enabled although your processor supported Intel VT, AMD-V or VIA VT. After you had enabled the processor virtualization extensions in BIOS, you must do a hard reboot by fully power down the computer and then start it again.

    [JackNg: Please refer to "Error message about hardware-assisted virtualization for Windows XP Mode in Windows Virtual PC on a computer that is running Windows 7
    " on applying KB977206 (for x86 or x64 based versions of Windows 7) update to remove the prerequisites required to run Windows Virtual PC and Windows XP Mode on non-HAV (Hardware-Assisted Virtualization) machines.]

    Sometimes users will get an error message that the processor virtualization is not enabled despite enabling processor virtualization in the BIOS and completely powering down the computer. This is a known issue with Trusted Execution Technology (TXT) and virtualization. Hence, please also disable the TXT in the BIOS.

    To check whether your processor support Intel VT, AMD-V or VIA VT, or if you receive the message "This computer does not have hardware-assisted virtualization" or "Hardware-assisted virtualization is not enabled on this computer", please download and run the "Hardware-Assisted Virtualization (HAV) Detection Tool".


Procedures to install Windows XP Mode and Windows Virtual PC in Windows 7 OS:
  1. BIOS configuration
    Please power on your Windows 7 OS pc/notebook and go to your pc/notebook BIOS.

    • For Fujitsu LifeBook T4220 notebook, kindly press F2 to enter BIOS. Kindly click "Advanced" -> "CPU Features". Please enable the "Virtualization Technology". Then, kindly press "Exit" -> "Exit Saving Changes" from the BIOS.

    • For Dell Optiplex 755 pc with A17 BIOS, kindly press F2 to enter BIOS. Kindly set "Performance" -> "Virtualization" -> "on". Then, also under "Performance", kindly set "VT for Direct I/O" -> "on". Press "Esc" and select "Save/Exit" to save the changes and exit from the BIOS.

    • For Dell Optiplex 780 (A04 BIOS) or Optiplex 990 (A03 BIOS) pc, kindly press F2 to enter BIOS. Kindly click "Virtualization Support" -> "Virtualization". Please enable the "Enable Intel Virtualization Technology" and click the "Apply" button. Then, kindly click "VT for Direct I/O". Please enable the "Enable Intel VT for Direct I/O" and click the "Apply" button. Kindly click the "Exit" button to exit from the BIOS.

    • For Dell Inspiron N4050 (A06 BIOS) notebook, kindly press F2 to enter BIOS. Kindly go to "Advanced" and enabled the "Virtualization".

  2. Download Windows XP Mode & Windows Virtual PC installers
    Assume you are already running Windows 7 Enterprise SP1 x86 OS. Please surf "Windows Virtual PC" to download Windows XP Mode (492,597,008 bytes) and Windows Virtual PC installers according to your Windows 7 OS types. You will need to install a Windows Activation Update software from Microsoft website to verify that you have a non-pirated copy of Windows OS installed before you are allowed to download the installers.

  3. Installation steps for Windows XP Mode and Windows Virtual PC
    After downloading the Windows XP Mode and Windows Virtual PC installers, kindly install Windows XP Mode first by double-clicking the file WindowsXPMode_nn-NN.exe (where nn-NN is the locale code, for example, en-US) and then completing the wizard that opens.

    Windows XP Mode consists of a fully activated copy of Windows XP Professional Service Pack 3 virtual machine (Windows XP Mode base.vhd) locates at the default Windows XP Mode installation directory (c:\Program Files\Windows XP Mode\).


    After finishing installing the Windows XP Mode, kindly install Windows Virtual PC by double-clicking either the files Windows6.1-KB958559-x86.msu or Windows6.1-KB958559-x64.msu, depending on your processor type. The installation will prompt you whether you want to install the Windows software update for Windows (KB958559), kindly click "Yes". At the end of the Windows Virtual PC installation, [save your work (if any) first] kindly click the "Restart Now" button to restart your pc.

  4. Setup Windows XP Mode virtual machine
    In your Windows 7 environment, kindly click "Start" -> "All Programs" -> "Windows Virtual PC" -> "Windows XP Mode". Kindly click the "Start the virtual machine" button.

    After accepting the Microsoft Windows XP Mode License Agreement,

    WindowsXPmode_installFolder_Credentials

    • under the "Installation folder and credentials", please change your installation folder from the default "c:\Users\UserName\AppData\Local\Microsoft\Windows Virtual PC\Virtual Machines" directory to "d:\VirtualMachines". Storing your Virtual Machines files in d:\ drive is recommended to prevent lost of your Virtual Machines files in future if your OS needs to be reformated and reinstalled.

      Under the "Create credentials", kindly key in the password twice for the default user name calls XPMuser that has administrator privilege in Windows XP Mode virtual machine. Please ensure that you remember the password provided during the setup process because you will need it to log on to the Windows XP Mode virtual machine.

      Please leave the "Remember credentials" (for automatically log on to the Windows XP Mode virtual machine) checked and click the "Next" button.

      [JackNg: Using blank password for the XPMuser is not recommended because when you run the Windows XP Mode virtual machine with Integration Features enabled (recommended), it will prompt you to enter the credentials by login as XPMuser with a password. You cannot login as XPMuser with a blank password because you will see a logon error message "Unable to log you on because of an account restriction".

      To solve the logon error message "Unable to log you on because of an account restriction" as you had set a blank password for XPMuser, on the Windows XP Mode virtual machine toolbar, kindly click "Tools" -> "Disable Integration Features". Then, kindly login as XPMuser with a blank password. Once login to the Windows XP Mode virtual machine, please go to the "Control Panel" -> "User Accounts" to set a password for the XPMuser. Then, on the Windows XP Mode virtual machine toolbar, kindly click "Tools" -> "Enable Integration Features".]
    • Click "Help protect my computer by turning on Automatic Updates now" and click the "Next" button.
    • On the "Setup will share the drives on this computer with Windows XP Mode", click the "Start Setup" button.

    After the setup of the Windows XP Mode virtual machine is completed, you will be presented with a "Windows XP Mode - Windows Virtual PC" window.

  5. Enable Integration Features for Windows XP Mode virtual machine
    On the Windows XP Mode virtual machine toolbar, kindly check that the Integration Features is enabled by clicking "Tools". If the drop-down "Tools" menu shown "Disable Integration Features", it indicates that the Integration Features is enabled.

    If the Integration Features is not enabled, kindly login to the Windows XP Mode virtual machine. On the Windows XP Mode virtual machine toolbar, kindly click "Tools" -> "Enable Integration Features". Follow the instructions and restart the Windows XP Mode virtual machine.

    Integration Features run inside the guest virtual machine and communicate directly with the operating system on the host computer thereby enabling smoother user interaction. Integration Features enable sharing of clipboard, printers, drives, smart cards and supported plug and play devices between the guest virtual machine and the host computer. For example, you can move the mouse from between guest and host applications.

  6. Installing and configuring applications in Windows XP Mode virtual machine
    In the "Windows XP Mode - Windows Virtual PC" window, you can start installing and running your old Windows XP software within this Windows XP Mode virtual machine (also known as Desktop Mode) exactly as if you were running them on a Windows XP-based PC.

    Please make sure that during your installation of the old Windows XP software in the Windows XP Mode virtual machine, your installation is set for "everyone" (All Users) usage so that your old Windows XP software link(s) that are stored at \Documents and Settings\All Users\Start Menu\Programs will be automatically publish in your Windows 7 OS Start Menu under "Start" -> "All Programs" -> "Windows Virtual PC" -> "Windows XP Mode" -> "Windows XP Mode Applications".

    If you don't want an old Windows XP software (eg: an anti-Virus software) in the Windows XP Mode virtual machine to automatically publish its link(s) to the Windows 7 OS Start Menu, you can either

    • delete that old software link from the \Documents and Settings\All Users\Start Menu\Programs directory in the Windows XP Mode virtual machine or
    • add that old software path into the VPCVAppExcludeList in the Windows XP Mode virtual machine Registry Editor (regedit or regedt32) under \HKEY_LOCAL_MACHINE\SOFTWARE\Microsoft\Windows NT\CurrentVersion\Virtual Machine\VPCVAppExcludeList. You have to restart the Windows XP Mode virtual machine for the registry changes to take effect.


Running Windows XP applications in Seamless Mode

Windows XP Mode virtual machine for Microsoft Windows 7 enables you to run your old Windows XP software directly from the Windows 7 desktop in what is called “Seamless Mode” . This means that once you have installed a software in Windows XP Mode virtual machine, it will also appear in your Microsoft Windows 7 "All Programs" menu, along with all of your other Windows 7 applications.

Hence, you do not have to open the Windows XP Mode desktop environment in order to run these old Windows XP software. Simply launch them directly from the Windows 7 Start Menu (or from the Windows 7 desktop, if you have already created a desktop shortcut there for that software). Launching this old Windows XP software also means launching the Windows XP Mode virtual machine. Thus, it may take a while for the software to complete this process. To speed up the boot up process of the Windows XP Mode virtual machine, you should put it into “hibernation” mode when not in use. After the Windows XP Mode virtual machine is launched, the old Windows XP software will perform exactly like any other applications on the Windows 7 desktop.


Hibernation vs Log-Off

When you are through working with the Windows XP Mode environment (Desktop Mode), you can put it into “hibernation” mode simply by clicking on the "Action" -> "Close" button in the upper left corner.

If it is the first time that you have run a Windows XP application in Desktop mode, you may be asked to log-off before the Windows XP virtual machine completes the hibernation process. Once you have logged on again, you can continue to work in the regular Windows 7 mode, Windows XP Seamless Mode, or Windows XP Desktop Mode whenever you like.


Shutdown Windows XP Mode environment (Desktop Mode)

When you are through working with the Windows XP Mode environment (Desktop Mode), you can put it into “shutdown” mode simply by clicking on the "Ctrl+Alt+Del" (upper right corner) -> "Shut Down" -> "Shut down" -> "OK".


Change the Windows XP Mode virtual machine settings

Kindly ensure that your Windows XP Mode virtual machine was shutdown. In your Microsoft Windows 7 environment, kindly click "Start" -> "All Programs" -> "Windows Virtual PC". Kindly select the Windows XP Mode virtual machine and click the "Settings" button. It is recommended to change the memory for your Windows XP Mode virtual machine to at least 512 MB so that it can run smoothly. Please note that the amount of memory that can allocate to the Windows XP Mode virtual machine is limited by the available memory on your physical machine.


Virtual Machine file types and backup/restore your virtual machine

Please surf "Various File Types for Virtual Machine Backup in Windows Virtual PC" for more information.


Remove Windows XP Mode, virtual machines, or Windows Virtual PC

Please surf "Remove Windows XP Mode, virtual machines, or Windows Virtual PC" for more information.


Sharing a Folder on Windows 7 Desktop with a VM

Please surf "Sharing a Folder on Windows 7 Desktop with a VM" for more information.


FAQ

  1. I have added a non-administrator user to the Windows XP Mode Virtual Machine. Why the new non-administrator user cannot login to the Windows XP Mode Virtual Machine ?

    In order to login to the Windows XP Mode Virtual Machine, and use the integration features, user has to be a member of the “Remote Desktop Users” group on the Guest Operating System (Windows XP Mode Virtual Machine). An Administrator user has access anyways and need not be part of the “Remote Desktop Users” group. However, if the user is a non-administrator user, he/she has to be member of “Remote Desktop Users” group on the Guest Operating System.


References:

[1] TechNet Blogs: Windows Virtual PC

[2] Windows Virtual PC: Documentation and videos

[3] Windows Virtual PC Tips

Wednesday, May 4, 2011

Recover a Virtual Machine that disappears in Hyper-V Manager Console (Rev: 1.0)


When trying to start a created Virtual Machine calls WinXPsp3_x86 in the Windows Server Enterprise 2008 SP2 Operating System with Trend Micro OfficeScan Client (antivirus software) running, a failure message shown below appeared and the Virtual Machine WinXPsp3_x86 disappeared automatically from the Microsoft Hyper-V Manager Console:

The server encountered an error while starting WinXPsp3_x86.
Microsoft Synthetic Ethernet Port (Instance ID {
7E0DA81A-A7B4-4DFD-869F-37002C36D816}): Failed to power on with Error 'The specified network resource or device is no longer available'.

Below are the steps on how to recover the lost Virtual Machine that automatically disappears in the Hyper-V Manager Console after it failed to power on the “Microsoft Synthetic Ethernet Port” in the Virtual Machine:

  1. If the real-time scanning component of the antivirus software is running, please surf "Virtual machines are missing in the Hyper-V Manager Console or when you create or start a virtual machine, you receive one of the following error codes: "0x800704C8", "0x80070037" or "0x800703E3"" on how to configure the real-time scanning component of your antivirus software to exclude monitoring the Hyper-V Virtual Machine directories and files.


  2. Stop the Hyper-V Virtual Machine Management service (vmms) as the Virtual Machine configuration files are locked by the Hyper-V Manager Console:

    # net stop vmms
    The Hyper-V Virtual Machine Management service is stopping.
    The Hyper-V Virtual Machine Management service was stopped successfully.


  3. Use Notepad to open the xxx.xml configuration file for that failed Virtual Machine, WinXPsp3_x86 which is located at the Virtual Machine directory. The xxx.xml configuration file name will be the GUID of the Virtual Machine with a .xml extension. For example:
    D:\VirtualMachine\WinXPsp3_x86\Virtual Machines\B633D31C-374C-4E17-89A9-71214BBDBBCA.xml


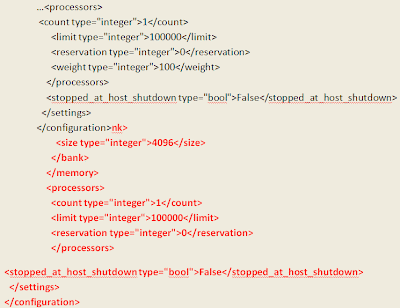
  4. In Notepad, kindly navigate to the bottom of the xxx.xml file. You will find the corruption starting at "nk" and ending at the end of the "/configuration":


  5. In Notepad, kindly delete all the highlighted bolded red part at the end of the xxx.xml file.


  6. In Notepad, save the xxx.xml file and exit from Notepad. Kindly restart the Hyper-V Virtual Machine Management service before starting the Hyper-V Manager Console:
    # net start vmms
    The Hyper-V Virtual Machine Management service is starting.
    The Hyper-V Virtual Machine Management service was started successfully.


  7. Start Hyper-V Manager Console. Your missing Virtual Machine should reappear in the Hyper-V Manager Console.


  8. Click Connect to start the Virtual Machine in the Hyper-V Manager Console.

References:

[1] Errors with VM creation/config/start

[2] Virtual machines are missing in the Hyper-V Manager Console or when you create or start a virtual machine, you receive one of the following error codes: "0x800704C8", "0x80070037" or "0x800703E3

Wednesday, March 23, 2011

Solved slow bootup with blank screen on Lenovo x200 tablet type 7449-A12 (Rev: 1.0)


When power on the Lenovo x200 tablet type 7449-A12, the screen is blank for about 15 minutes before the Lenovo x200 tablet start to boot up normally to the Windows 7 x64 Operating System (OS). The problems were due to the Trust Platform Module (TPM) was not in operational mode and the Intel Active Management Technology (AMT) Firmware needs to be updated to version 4.2.21.1037 or higher version.

Solutions:
  1. Please make sure that you have already download and installed the below for Lenovo x200 tablet type 7449-A12:

  2. In the Lenovo x200 tablet BIOS (press F1 to enter into BIOS during power on), kindly make sure that the "Intel (R) AMT Control" is enable in the BIOS "Config" -> "Intel (R) AMT" -> "Intel (R) AMT Control". Below are the default setting for "Intel (R) AMT Control" in the Lenovo x200 tablet BIOS:
    • AMT CIRA timeout = 0 (default to timeout at 60 seconds)
    • Console type = PC ANSI
    • IDE-R for normal boot = Hidden

  3. Please download Intel AMT 4.2 Management Engine (ME) Firmware version 4.2.21.1037 (7ur6c4ww.exe) or higher version. After extracting the 7ur6c4ww.exe to a directory, and after reading the installation instructions, I opened a Command Prompt with "Run as administrator" right, and run the "meupdate.cmd" file. It will takes about 3 minutes to update the Intel AMT 4.2 Management Engine (ME) Firmware in Windows 7 x64 OS. After that, kindly reboot the Lenovo x200 tablet. You will immediately see a normally boot up screen (no more blank screen for about 15 minutes) on the Lenovo x200 tablet.

    In the Windows 7 x64 OS, the Intel TPM will be in "Operational" stage with "inactive: Unowned: Enable" settings. The "TCG Spec Version" is 1.2 and the "Firmware version" is 4.2.21.1037.

Sunday, January 16, 2011

记忆法总结 (Rev: 1.0)


  • 睡觉前和醒来后是两个绝佳的记忆黄金时段!睡前的这段时间内可主要用来复习白天或以前学过的内容。早晨起床后,记忆新内容或再复习一遍昨晚复习过的内容,则整个上午都会记忆犹新。

  • 复习、温故。
    及时复习、间隔一般不超过2天。
    分散复习。分散复习可减轻大脑疲劳,保持大脑神经的兴奋同时,间隔的时间还能起到巩固的作用。
    复习间隔。相互间意义联系较少的识记材料在学习后的1—2小时内必须抽出5-10分钟来复习。

  • “联想”:如果你想记住什么,你要做的就是将它与已知或已记住的东西联系起来。联想就是从脑中从一事物想到另一事物的心里活动。例如,看到昔日的照片则往事如烟,一幕幕浮现于眼前。
    • 浮现物象。联想时要尽量使联想内容形象化、具体化。说十遍不如看一遍,实物教学远比单纯的讲解更易让人理解,并能有助于回忆。比如当我说“恋人”,你想到的一定是最令你难忘的那个人,而不是“恋人”这两个字。

    • 生动。在浮现物象的同时,要尽可能赋予物体运动的、立体的、多层次的色彩。例如,“海”可想成波涛汹涌、大浪滔天的海,也可想成夕阳西下与恋人轻松散步的那个温柔的海。总之要让记忆内容动起来,并尽可能调动身体其它部位的感觉,层次的、立体的去记忆某一内容。

    • 关已。大多数人对于不关自己的事或关系不到自己切身利益的事通常不注意,也容易淡忘。所以我们在进行联想的时候,要把记忆内容同自己联系起来,要同自己挂钩,往自己身上联想,把自己置身其中,而不是局外人、旁观者。

    • 荒诞夸张。人们对于平淡无奇的事容易忘记,相反对那些荒诞夸张、不合常理的事却经久、甚至终身不忘。

    • 抽象词语记忆秘诀:
      a) 懂得原意的用原意,不好用的再“
      望文生义”。如关税壁垒,本是贸易保护方式的一种,若不懂就转化成别的含义,只要能正确还原就行。

      b) 在抽象词语中
      加减字,“曲解”成另外的含义。如抽象劳动可变成:抽(打大)象(让它快点)劳动;苦难加字变成:(叫)苦(叫)难等。就这么加加减减,无论多么生疏难懂的词语都可转换成为你所能读懂的意思。在记住的基础上要尽快弄懂该词的真正含义。

      c)
      谐音是记忆的窍门。经过谐音的处理,枯燥、艰涩的词语会变得不那么面目可憎,而是变得诙谐幽默,便于记忆了。如“佛得角”谐音成“佛得饺”(想成是饺子的一种), “里海”还可谐音成“利害”等。

    • 联想时,叙述性内容要尽量简短,这样回忆起来也可以缩短时间。如果编的故事太长,回忆时不仅费时而且还有忘记的危险。

    • 联想完成后,不要总觉得还有更好的联想,从而频繁更换联想内容,这样回忆时容易造成混乱。

  • 数字编程联想法: 是把10个阿拉伯数字及其每个组合都赋予特定的意思(即编程),然后作为与记忆对象进行联想的工具。

  • 人名的记忆方法,除了从其字面上理解外,还可将人名同该人的面部特征、职业、单位、个人爱好、习惯、以及你与他见面时的场所、情景等其它方面进行联想,经过联想处理后,人名就会牢牢记住了。我们在联想人名的过程中,难免会“曲解”其原来的意思,但我们这样做完全是为了能快速记住它,并没有“侮辱”某人的意图。例如,沈丽丽:我家靠养鸭来养活全家,所以鸭子吃的饲料,爸爸会仔细审(沈)查,一粒粒(丽丽)的看,生怕鸭子吃了不干净的东西得病。   

Reference

[1] 则优超级记忆法

Tuesday, December 14, 2010

Apple iPad Free or Compatible Applications (Rev: 2.4)


Search the below applications in iTunes -> iTunes Store (locates at the LHS under "STORE" in iTunes) (JackNg: For iTunes v11.0.1.12 or higher version, please click "View" -> Show Sidebar or [Ctrl] + s to see the sidebar.) -> "Search Store" [locates at the top Right Hand Side (RHS) column]

  1. Dictionaries

    • 英汉字典 EC Dict (简体版) (English-Chinese Dictionary) v4.3 (13.7 MB)
      [Design for iPhone/iPad] [JackNg: Not available in Singapore App Store anymore. 英汉字典 EC Dict v4.3 contains advertisement. You can paid $1.28 to remove the advertisement in the "Setting".]
      • Can save your checked words into the bookmark section.
      • To hear the sound voice of the word, you need an internet connection.
      • Chinese interface design type.
      • Recommend to tilt the iPad to landscape orientation for better search and explanation view.

    • Advanced English Dictionary and Thesaurus v4.0.5 (56.7 MB)
      [Design for iPhone/iPad]
      • In iPad Settings -> English, you can increase/decrease the text size and turn on/off the "Advanced Search".
      • Recommend to tilt the iPad to landscape orientation for better search and explanation view.

    • KTdict C-E (Chinese-English dictionary) v2.0 (8.2 MB)
      [Design for iPhone/iPad]
      • No Internet connection required.
      • The advanced search technology implemented into KTdict C-E shows you instant as-you-type search results. You can search using English, Chinese characters (simplified and traditional) and Hanyu Pinyin.


  2. Alarm Clock HD Free v1.2.3 (13.4 MB)
    [Design for iPad]
    • This app must be running if you want the alarm to wake you up. Hence, please remember not to power off your iPad after you have set the alarm.
    • Can save different types of alarm settings.
    • Slide/flick up and down to dim the screen.
    • Alarm works even if screen is locked or iPad is in silent mode.
    • The weather conditions and temperature functions requires internet connection.

  3. Ambibma ShuBook 書僕 v3.3 (2.0 MB)
    [Design for iPhone/iPad]
    • Support various ebook or comics format: .epub, .txt, .pdb, .updb (Haodoo variation).
    • Free download of ebooks from the internet:
    • Auto-detection of plain TXT file encoding (including UTF-8, GB18030, Big5).
    • Auto-partition of large TXT files for a smoother reading experience.
    • After you have transfer your books from your pc (using iTunes -> ShuBook app "File Sharing" function) to iPad using the USB connection, you will still need to perform an extra step in iPad in order to import the books in iPad:

      • In iPad, kindly tap "ShuBook" -> "Download" -> “ShuBook Documents” to import the transfer books into ShuBook Library. More info at "How to get books from iTunes".

  4. GlobeConvert: Currency & Units Converter v1.7.1 (5.8 MB)
    [Compatible with iPhone/iPad/iPod touch]
    • Can save your most used conversion into the favorites section.
    • To update the currencies rate, you need an internet connection.
    • An iPad App version is available at US$0.99.
    • Screen size is small because it is design for use in iPhone/iPod. In iPad, there is a "2x" small circle at the bottom RHS of the screen. Tap it with your finger to zoom the "GlobeConvert: Currency & Units Converter" window to fill up the iPad screen.

  5. iBooks v2.2 (37.2 MB)
    [Design for iPhone/iPad]
    • iBooks from Apple Inc. includes the iBookstore where you need an internet connection to download books (many are free) using your Apple ID account.
    • iBooks can only opens books published in the ePub electronic book format or documents in the PDF format.
    • You can add PDF file to iBooks in 2 ways:
      1. Select a PDF file from an email message on your iPad and open it in the iBooks app, where it appears on the bookshelf.
      2. Add a PDF file to your iTunes library on your Mac or PC and sync it to your iPad:
        • Assume you have already connected your iPad to your computer using the USB connection. In iTunes, kindly click "Files" -> "Add File to Library". At the pop up "Add to Library" prompt, browse to the directory where you have kept your PDF file, select it and click the "Open" button. ITunes will place your loaded PDF file under the "LIBRARY" (locates at the top LHS of iTunes) -> "Books".
        • In iTunes, under "DEVICES" (locates at the LHS of iTunes), kindly click your iPad device and then click the "Books" (locates at the center top navigation bar in iTunes).
        • Click to check the "Sync Books" where the default is to sync "All books". Click the "Apply" button to start synchronizing your PDF file to the iPad iBooks Collections.


  6. iMedia Player v1.1 (15.0 MB)
    [Free, designed for both iPhone and iPad]
    iMedia Player can play almost any video or audio file formats without converting hassles. However, the iMedia Player v1.1 does not support AC3 and E-AC3 audio formats. The developer was already awared of this AC3 audio problems and may come out a fixed on the next release version of iMedia Player. You can copy files to iMedia Player documents via USB or WiFi.

    iMedia Player Supported File Format Extension
    • XVID/DIVX AVI, WMV, RMVB, ASF, H264, MKV, TS, M2TS (most of all movie file formats)
    • MP3, WMA, WAV, OGG, FLAC (most of all audio file formats)
    • SMI, ASS, SSA, SUB, SRT, TXT (most of all subtitle file formats)

  7. Bookman Pro (PDF/Comic Reader) for iPad v3.3.1 (20.4 MB, US$3.98) [Bookman website]
    [JackNg: Since 25 Oct 2011, there is no more free PDF/Comic Reader Bookman Lite for iPad v3.0.2 (9.4 MB, Free App). Only paid version of  Bookman Pro (PDF/Comic Reader) for iPad v3.3.1 or higher version is available]

    [JackNg: PDF/Comic Reader Bookman Lite for iPad v3.0.2 (9.4 MB, Free App) and PDF/Comic Reader Bookman Pro v3.0.2 (9.0 MB, US$2.99) were launched on 24 May 2011. However, I still prefer the old version v2.7.0 because it looks and functions better than the new v3.0.2. Moreover, user had feedback that the new turning of multiple pages in v3.0.2 had made the browsing worst and complicated.]

    • Compatible with archive file formats used for comics (CBR, CBZ, RAR, ZIP). Suitable for comics (numerous sequence numbering .jpg images that are stored in sequence numbering folders) viewing due to some of the below Bookman creative designs:

      • large thumbnails for viewing your numerous image files
      • bookmarks with a folder function
      • history function that go back to the last view page
      • a small page button that can quickly adjust to the desire page number
      • fast turning pages speed
        (Need to change it in Bookman Settings -> Page Turn Effect -> Fast)
    • Built-in web browser allows you to easily download eBooks from the internet: Feedbooks, Smashwords, etc.
    • Have a variety of methods to transfer your files to the iPad:
      • iTunes file sharing function that uses the USB connection between your iPad and computer
      • Wireless FTP forwarding method
      • Mail file attachments method
      • Using applications such as DropBox.
    • If some of your numerous .jpg files that are stored in sequence numbering folders contains Chinese characters in the front of their filename, that particular sequence folder with those Chinese characters .jpg filename will appear first in that comics list. To make the comics .jpg files list in numbering sequence order, you need to renaming the .jpg files by removing the Chinese characters.
    • Assume that you already have installed WinRaR. If you have a comics calls comicsBook1 that contains numerous sequence numbering .jpg images that are stored in sequence numbering folders, select all the sequence numbering folders, right-click and select "add to comicsBook1.rar". After that, connected your iPad to your computer using the USB connection and add the "comicsBook1.rar" file to your iPad through the iTunes Bookman app File Sharing function. You can view the "comicsBook1.rar" comics file in iPad using Bookman now.

  8. TouchCalc (Calculator) v2.0 (0.2 MB) [Recommended]
    [Design for iPhone/iPad]
    • A powerful calculator with scientific mode, bit/integer mode and statistics mode.

  9. Finger Write - Use Your Handwriting v6.7 (12.2 MB)
    [Design for iPhone/iPad]
    • Write fast note (without using the popup keyboard) by using your finger on the iPad.

  10. USB Disk for iPad v1.3.2 (6.6 MB)
    [Compatible with iPad]
    • Store and view the below file types on your iPad:
      • PDF files
      • MS Office documents [JackNg: Can open Microsoft Office 2007 documents]
      • iWork documents
      • Pictures (jpg, png, gif, etc)
      • eBooks (pdf, html, txt, etc)
      • Audio files (mp3, m4a, wav, etc)
      • Video files (m4v, mov, some avi, etc)
    • Drag and drop files in iTunes to transfer them to your iPad, then view them in your iPad.
    • Automatically restores your last viewing position.


  11. Wireless@SG
    Wireless@SG is a wireless broadband programme developed by Info-Communications Development Authority (IDA) and is run by 3 Singapore local wireless operators:
    iCELL Network, M1 and SingTel. 

    Users can enjoy free (till 31 March 2013), both in-door and outdoor seamless wireless broadband access with speeds of up to 1 Mbps at public areas in Singapore. You will need to register for Wireless@SG service from any of the 3 wireless operators before you can have internet access:


    In iTunes -> iTunes Store, kindly type "wireless@sg" to search for the below applications:

    • Wireless@SG iCELL v1.0 (0.8 MB)
      [Compatible with iPhone, iPad and iPod touch]
    • Wireless@SG Connect (for M1) (iPhone) v1.2 (1.2 MB)
      [Compatible with iPhone, iPad and iPod touch]
    • M1 Wireless@SG Connect for iPad v1.2 (1.2 MB)
      [Compatible with iPad]
      Both the above M1 Wireless@SG Connect app for iPhone and iPad (for M1 Mobile subscribers only) require that you enter your username in the following format: M1MobileNumber@M1. For example, 91234567@M1. You cannot login using "userName@m1net.com.sg" format in the above 2 M1 Wireless@SG Connect app.

      If you had already signed up a M1net.com.sg account, you have to access the internet connection through the Wi-Fi. In iPad, kindly click "Settings" -> "Wi-Fi". Choose "Wireless@SG" network, and login with your username as "userName@m1net.com.sg". If you face any problem, please contact M1Net Wireless@SG Customer Service, Help Desk and Technical Support Hotline 6655 5633 (9:00am to 9:00pm, Monday to Sunday).
    • Wireless@SG Connect SingTel v1.0 (0.8 MB)
      [Compatible with iPhone, iPad and iPod touch]

  12. VLC Media Player v1.1.0 (8.9 MB)
    [JackNg: Please use iMedia Player [free, designed for both iPhone and iPad] that can play almost any video file formats since VLC Media Player is not available at Apple AppStore anymore. More info at "Apple pulled VLC off the AppStore"]

    [JackNg: Not available from Apple Singapore/U.S. AppStore anymore since Jan 2011/2012. For more info, please read "Apple pulled VLC off the AppStore". However, it is still available in Apple French AppStore.]

    • VLC Media Player is a free and open source multimedia player that can play many different types of video files, including .rm, .rmvb, .flv, etc.
    • You can now delete files from the VLC App in iPad without having to go through iTunes.
    • You can transfer documents (eg: your video files) between iPad and your computer using the USB connection.
    • If you have transferred an unsupported video format file from iTunes VLC App to iPad, it will not appeared in the VLC App list in iPad. To delete the unsupported video format file that is already transferred to iPad, please perform the below steps:

      1. Connect your iPad to your computer using the USB connection, and open iTunes.
      2. In iTunes, under "DEVICES" (locates at the LHS of iTunes), kindly click your iPad device and then click the "Apps" (locates at the center top navigation bar in iTunes).
      3. In iTunes "Apps", under "File Sharing", click "VLC" App. Then, at the "VLC Documents" (on the RHS of VLC App), click on the unsupported video format file and change it extension to a supported video format file (eg: .flv). For example, I changed the unsupported video format file, video1.ivr to video1.flv. Click the "Sync" button in iTunes.
      4. Once the sync progress is completed, please do not disconnect your iPad from your computer. In iPad, tab the "VLC" icon and you will see the video1.flv. Tab "Edit". You will see a small round "x" icon appears on the top LHS of your video files. Tab on the small round "x" icon at the video1.flv that you want to delete. At the "Delete video" pop up prompt, tab "Delete".
    • Does not support .ivr video format
Apple iPad Free Japanese Related Applications
  1. Imiwa? (Japanese dictionary) (previous known as Kotoba!) v3.0.2 (187 MB) [Recommended]
    [Design for iPhone/iPad]

    • In Imiwa? -> Settings -> Languages, you can switch off unwanted languages such as French, German, Russian, Spanish, Portuguese, Italian, etc. I set my "Primary Language" as English.
    • Imiwa? speaks but this function requires a network connection and your device must run iOS 4 and above. Some languages may not have a female or male flavor. Using speech synthesis over a 3G/EDGE connection may induce additional charges if you do not have an unlimited data plan.

  2. 60+ languages Translation + Voice + Pronunciation - Google VS. Bing - iPronunciation FREE v4.1 (19.5 MB)
    [Compatible with iPhone, iPad and iPod touch. This app is optimized for iPhone 5]

    • Must need internet connection in order to function. For those who goes oversea and have auto roaming, beware of your bill.
    • Has small rectangular advertisement at the bottom of the screen.
    • Translation from English to Japanese does not contain all the possible wordings in noun or verb. For example, "Stare" is translated simply as "見詰める" (MiTsuMeRu. To stare at) only. It is not that useful as the Google Translate. However, both of them did not shown "睨む(にらむ)" (To stare intensely at).
    • An iPad App version is available at US$1.99.
    • Screen size is small because it is design for use in iPhone/iPod. In iPad, there is a "2x" small circle at the bottom RHS of the screen. Tap it with your finger to zoom the "53 languages Translation+Voice+Pronunciation - Google VS. Bing - iPronunciation FREE" window to fill up the iPad screen.

  3. Learning Japanese v2.0.1 (14.1 MB)
    [Design for iPhone/iPad]

    • "Learning Japanese" is an introduction guide for those who want to learn Basic Japanese language.
    • The Kanji word has no Romanji or Hiragana indication. Hence, if you don't know the Kanji word, you will not know how to read it.
    • The Search function does not work like a dictionary. Hence, you will have "No Results" if you are trying to search for the meaning of a word.
    • Screen size is small because it is design for use in iPhone/iPod. In iPad, there is a "2x" small circle at the bottom RHS of the screen. Tap it with your finger to zoom the "Learning Japanese" window to fill up the iPad screen.


Apple iPad related links/References
  1. Apple App Store
  2. NUS iPad Blog

Thursday, November 11, 2010

Solved unknown devices in Windows Server 2008 Enterprise OS on Dell Precision T5500 workstation (Rev: 1.0)


After installing Windows Server 2008 Enterprise Service Pack 2 (x64) Operating System (OS) on the Dell Precision T5500 workstation, there are some unknown devices in the Control Panel -> System -> Hardware -> Device Manager as shown below:


1. Ethernet Controller
-> Using Broadcom NetXtreme 57xx Gigabit Controller. Installing the Windows 7 64 bits device drivers using Broadcom 57XX Gigabit Integrated Controller version 15.0.0, A04 (R267778.exe) or higher version.

2. SM Bus Controller
3. System Interrupt Controller
-> Both the SM Bus Controller and System Interrupt Controller are using the Intel ICH8R/ICH9R/ICH10R DO SATA Raid Controller. Installing the Windows Vista 64 bits device drivers using the "Chipset -> Intel driver version 9.1.0.1007, A23 (R205428.exe) or higher version" from Dell.


The Dell Precision T5500 workstation comes with the nVidia Quadro FX 580 video adapter. Download the nVidia Quadro FX 580 video adapter by choosing Quadro -> Quadro FX series -> Quadro FX 580 -> Quadro Graphics driver -> Windows Server 2008 x64 R2.

Sunday, November 7, 2010

Solved unknown devices in Win7 OS on Lenovo W510 4391-CF6 notebook (Rev: 1.0)


After installing Windows 7 Enterprise x64 Operating System (OS) on the Lenovo ThinkPad W510 (Type: 4391-CF6) notebook, there are various unknown devices in the Control Panel -> Device Manager as shown below:

  1. Base System Device
    -> Using Windows Update will automatic install the device drivers. If not, you can try using Ricoh Multi Card Reader Driver v2.06.02.02 or higher version.

  2. Biometric Coprocessor
    -> Using Windows Update will automatic install the device drivers.

  3. Ethernet Controller
    -> Using Ethernet driver (Intel PRO/1000 LAN adapter software) v11.5.10.1030 or higher version.

  4. Network Controller
    -> Using Windows Update will automatic install the device drivers.

  5. PCI Serial Port
    PCI Simple Communications Controller
    -> Using Intel AMT 6.0 - Management Engine Interface and Serial Over LAN driver (SOL) Driver v6.0.0.1179 or higher version.

  6. Universal Serial Bus (USB) Controller
    -> Using USB 3.0 Driver v1.0.19.0 or higher version.

  7. Unknown device
    -> Using Windows Update will automatic install the device drivers.


The Lenovo ThinkPad W510 notebook comes with the nVidia Quadro NVS 5100m notebook series video adapter. Download the nVidia Quadro NVS 5100m notebook series video adapter by choosing Quadro -> Quadro NVS series (Notebooks) -> NVS 5100M -> Quadro Graphics driver -> choose your Operating System (eg: Windows 7 64-bit).


The below ThinkVantage Technologies software are also installed:

  • Power Manager v3.30 or higher version for Windows 7 (32-bit, 64-bit) and Vista (32-bit, 64-bit).

  • ThinkVantage Access Connections v5.72 or higher version for Windows 7 (32-bit, 64-bit). ThinkVantage Access Connections is a connectivity assistant program for your ThinkPad computer. It enables you to quickly switch the network settings and Internet settings by selecting a location profile.

  • ThinkVantage Active Protection System v1.72 or higher version for Windows 7 (64-bit) and Vista (64-bit). It provides airbag-like protection for your hard drive.

  • ThinkVantage Fingerprint Software v5.9.3.6581 or higher version for Windows 7 (64-bit). ThinkVantage Fingerprint Software enables:
    • reliable user authentication based on fingerprint recognition
    • boot protection using fingerprints
    • easy access to a computer using fingerprints (Logon Protector)

There are other ThinkVantage Technologies software available but I have not installed to test it.


Reference:

[1] Drivers and software - ThinkPad T410, T410i, T410s, T410si, T510, T510i and W510