Tuesday, August 5, 2008

Fixmbr, Backup your MBR using MBRwizard or MBRFix (Rev: 1.2)


Situation

I had a computer that used the GRUB boot loader to load either Fedora Core (FC) 5 or Windows XP Operating System (OS) during boot up. In Windows XP, I deleted the FC 5 partition to free up the hardisk space as I did not want to run the FC 5 anymore. During rebooting of the computer, the computer failed to load the Windows XP OS and it always stopped at the GRUB prompt.


Solution

The GRUB boot loader had installed itself as the master boot code to load the respective OS during the installation of FC 5. As I have deleted the FC 5 partition in Windows XP, the GRUB partition was deleted as well. Hence, the GRUB boot loader does not know how to load the OS because the GRUB files are deleted. We can perform the below steps to correct the Master Boot Record (MBR) problem using fixmbr:

  1. Boot the computer from the Windows XP installation CDROM. At the "Welcome To Setup screen" blue screen, kindly press r to run the Recovery Console.

  2. At the Recovery Console menu, kindly press the menu number to log on to your Windows OS. Please enter the administrator password if prompt.

  3. Assume that your Windows XP OS was installed at the C:\ drive. In the Recovery Console, kindly type fixmbr

    ** CAUTION **
    This computer appears to have a non-standard or invalid master boot record.
    FIXMBR may damage your partition tables if you proceed.
    This could cause all the partitions on the current hardisk to become inaccessible.
    If you are not having problems accessing your drive, do not continue.
    Are you sure you want to write a new MBR ? y
    -> Writing new master boot record on physical drive
    \Device\Hardisk0\Partition0.

    The new master boot record has been successfully written.


  4. Kindly type exit to quit from the Recovery Console and your computer will automatically reboot. Your computer should be able to boot to the Windows XP OS now.


Backup your MBR using MBRwizard or MBRFix

You can backup your MBR using
  • MBRwizard CommandLine
  • MBRFix
    • v1.0.9 for Windows NT/2000/XP/Server2003/Vista/PE
      MbrFix_v1.0.9.rar (including 1mbrfix.bat and 2mbrfix64.bat), 136100 bytes
      MbrFix_v1.0.9.rar md5 checksum: a5fe93bbaf37288f6c2fcec2fa23b895
    • v1.3.0.0 or higher version for Windows NT/2000/XP/Server2003/Vista/7/Server2008/PE

After downloading and unzipping the software, kindly open a Command Prompt window to run the software.

At the Command Prompt window, kindly type
mbrwiz /? or
mbrfix /?

to display the help page and license.


I have created a 1mbrwiz.cmd file (included inside MbrWiz_v1.53.rar) to run the MBRwizard. You can copy and paste the below 1mbrwiz.cmd codes, and save it as 1mbrwiz.cmd file at the same directory with the MBRWiz.exe file in order to run it.

------------- BEGIN 1mbrwiz.cmd codes -----------------------

@echo off

rem 1mbrwiz.cmd
rem To backup the MBR using MBRWiz.exe
rem Created by Jack, Rev: 1.0, August 2008

setlocal

%~d0
cd "%~dp0"

set MBRWIZFILE=mbrwiz.exe
if not exist %MBRWIZFILE% goto _ERROR1


:MENU
title MBRWizard Menu
set _choice=
cls
echo.
echo *********************************************
echo Please select which MBRWizard options to run
echo *********************************************
echo.
echo 1 List MBR entries
echo 2 Hides the Partition number
echo 3 Unhides the Partition number
echo 4 Activates the Partition
echo 5 De-activates the Partition number
echo 6 Deletes the partition
echo 7 Wipes the MBR or wipes the first 63 sectors of disk
echo 8 Saves the MBR to filename
echo 9 Reads and restores the Disk MBR from filename
echo 10 Shows contents of an existing MBR backup file
echo 11 Sort MBR Entries by disk location
echo.
echo Press [ENTER] to exit
echo.
echo.
set /p _choice="Enter choice number: "
echo.
if "%_choice%" == "" goto EXIT
cls
if "%_choice%" == "1" goto ListMBR
if "%_choice%" == "2" goto HidePartition
if "%_choice%" == "3" goto UnhidePartition
if "%_choice%" == "4" goto ActivatePartition
if "%_choice%" == "5" goto InactivatePartition
if "%_choice%" == "6" goto DeletePartition
if "%_choice%" == "7" goto WipeMBR
if "%_choice%" == "8" goto SaveMBR
if "%_choice%" == "9" goto RestoreMBR
if "%_choice%" == "10" goto ShowMBR
if "%_choice%" == "11" goto SortMBR


:ListMBR
title MBRWizard - List MBR entries
echo.
echo Running: mbrwiz.exe /list
echo.
mbrwiz.exe /list
echo.
goto EXIT


:HidePartition
title MBRWizard - Hides the Partition number
set DriveNumber=
set PartitionNumber=
echo.
echo Please enter the HDD to use ("0" for 1st, "1" for 2nd, ...)
echo.
echo Press [ENTER] to abort.
echo.
set /p DriveNumber="Enter drive number: "
if "%DriveNumber%" == "" goto EXIT
echo.
echo Please enter the partition ID to hide ("0" for 1st,
echo "1" for 2nd, ... or "*" for all).
echo.
echo Press [ENTER] to abort.
echo.
set /p PartitionNumber="Enter partition number to hide: "
if "%PartitionNumber%" == "" goto EXIT
echo.
cls
echo Running: mbrwiz.exe /disk=%DriveNumber% /hide=%PartitionNumber% /list
echo.
mbrwiz.exe /disk=%DriveNumber% /hide=%PartitionNumber% /list
if "%errorlevel%" == "0" goto SUCCESS
echo.
goto EXIT


:UnhidePartition
title MBRWizard - Unhides the Partition number
set DriveNumber=
set PartitionNumber=
echo.
echo Please enter the HDD to use ("0" for 1st, "1" for 2nd, ...)
echo.
echo Press [ENTER] to abort.
echo.
set /p DriveNumber="Enter drive number: "
if "%DriveNumber%" == "" goto EXIT
echo.
echo Please enter the partition ID to unhide ("0" for 1st,
echo "1" for 2nd, ...; "*" for all).
echo.
echo Press [ENTER] to abort.
echo.
set /p PartitionNumber="Enter partition number: "
if "%PartitionNumber%" == "" goto EXIT
echo.
cls
echo Running: mbrwiz.exe /disk=%DriveNumber% /unhide=%PartitionNumber% /list
echo.
mbrwiz.exe /disk=%DriveNumber% /unhide=%PartitionNumber% /list
if "%errorlevel%" == "0" goto SUCCESS
echo.
goto EXIT


:ActivatePartition
title MBRWizard - Activates the Partition
set DriveNumber=
set PartitionNumber=
echo.
echo Please enter the HDD to use ("0" for 1st, "1" for 2nd, ...)
echo If you do not know which HDD to choose,
please enter
echo 'bm' to call the bootmenu.
echo.
echo Press [ENTER] to abort.
echo.
set /p DriveNumber="Enter drive number: "
if "%DriveNumber%" == "" goto EXIT
if "%DriveNumber%" == "bm" goto BOOTMENU
echo.
echo Please enter the partition ID to activate ("0" for 1st, "1" for 2nd, ...).
echo.
echo Press [ENTER] to abort.
echo.
set /p PartitionNumber="Enter partition number: "
if "%PartitionNumber%" == "" goto EXIT
echo.
cls
echo Running: mbrwiz.exe /disk=%DriveNumber% /active=%PartitionNumber% /list
echo.
mbrwiz.exe /disk=%DriveNumber% /active=%PartitionNumber% /list
if "%errorlevel%" == "0" goto SUCCESS
echo.
goto EXIT


:InactivatePartition
title MBRWizard - De-activates the partition number
set DriveNumber=
set PartitionNumber=
echo.
echo Please enter the HDD to use ("0" for 1st, "1" for 2nd, ...)
echo.
echo Press [ENTER] to abort.
echo.
set /p DriveNumber="Enter drive number: "
if "%DriveNumber%" == "" goto EXIT
echo.
echo Please enter the partition ID to deactivate ("0" for 1st,
echo "1" for 2nd, ...; "*" for all).
echo.
echo Press [ENTER] to abort.
echo.
set /p PartitionNumber="Enter partition number: "
if "%PartitionNumber%" == "" goto EXIT
echo.
cls
echo Running: mbrwiz.exe /disk=%DriveNumber% /inactive=%PartitionNumber% /list
echo.
mbrwiz.exe /disk=%DriveNumber% /inactive=%PartitionNumber% /list
if "%errorlevel%" == "0" goto SUCCESS
echo.
goto EXIT


:DeletePartition
title MBRWizard - Deletes the partition
set DriveNumber=
set PartitionNumber=
echo.
echo Please enter the HDD to use ("0" for 1st, "1" for 2nd, ...)
echo.
echo Press [ENTER] to abort.
echo.
set /p DriveNumber="Enter drive number: "
if "%DriveNumber%" == "" goto EXIT
echo.
echo Please enter the partition ID to delete ("0" for 1st, "1" for 2nd, ...).
echo.
echo Press [ENTER] to abort.
echo.
set /p PartitionNumber="Enter partition number: "
if "%PartitionNumber%" == "" goto EXIT
echo.
cls
echo Running: mbrwiz.exe /disk=%DriveNumber% /del=%PartitionNumber% /list
echo.
mbrwiz.exe /disk=%DriveNumber% /del=%PartitionNumber% /list
goto EXIT


:WipeMBR
title MBRWizard - Wipes the MBR or wipes the first 63 sectors of disk
set DriveNumber=
set OPTION=
echo.
echo Please enter the HDD to use ("0" for 1st, "1" for 2nd, ...)
echo.
echo Press [ENTER] to abort.
echo.
set /p DriveNumber="Enter drive number: "
if "%DriveNumber%" == "" goto EXIT
echo.
echo Please enter "1" for wipes the MBR, "2" for wipes of first 63 sectors of disk.
echo.
echo Press [ENTER] to abort.
echo.
set /p OPTION="Enter option: "
if "%OPTION%" == "" goto EXIT
echo.
cls
echo Running: mbrwiz.exe /disk=%DriveNumber% /wipe=%OPTION% /list
echo.
mbrwiz.exe /disk=%DriveNumber% /wipe=%OPTION% /list
goto EXIT


:SaveMBR
title MBRWizard - Save the MBR to filename
set DriveNumber=
set Filename=
echo.
echo Please enter the HDD to use ("0" for 1st, "1" for 2nd, ...)
echo.
echo Press [ENTER] to abort.
echo.
set /p DriveNumber="Enter drive number: "
if "%DriveNumber%" == "" goto EXIT
echo.
echo Please enter filename to save (eg: hd0.mbr)
echo.
echo Press [ENTER] to abort.
echo.
set /p Filename="Enter filename: "
if "%Filename%" == "" goto EXIT
echo.
cls
echo Running: mbrwiz.exe /disk=%DriveNumber% /save=%Filename%
echo.
mbrwiz.exe /disk=%DriveNumber% /save=%Filename%
echo.
goto EXIT


:RestoreMBR
title MBRWizard - Reads and restores the Disk MBR from filename
set DriveNumber=
set Filename=
echo.
echo Please enter the HDD to use ("0" for 1st, "1" for 2nd, ...)
echo.
echo Press [ENTER] to abort.
echo.
set /p DriveNumber="Enter drive number: "
if "%DriveNumber%" == "" goto EXIT
echo.
echo Please enter filename to restore (eg: hd0.mbr)
echo.
echo Press [ENTER] to abort.
echo.
set /p Filename="Enter filename: "
if "%Filename%" == "" goto EXIT
echo.
cls
echo Running: mbrwiz.exe /disk=%DriveNumber% /restore=%Filename% /list
echo.
mbrwiz.exe /disk=%DriveNumber% /restore=%Filename% /list
echo.
goto EXIT


:ShowMBR
title MBRWizard - Shows contents of an existing MBR backup file
set Filename=
echo.
echo Please enter filename to display (eg: hd0.mbr)
echo.
echo Press [ENTER] to abort.
echo.
set /p Filename="Enter filename: "
if "%Filename%" == "" goto EXIT
echo.
cls
echo Running: mbrwiz.exe /showfile=%Filename%
echo.
mbrwiz.exe /showfile=%Filename%
goto EXIT


:SortMBR
title MBRWizard - Sort MBR Entries by disk location
echo.
echo Running: mbrwiz.exe /issorted /list
echo.
mbrwiz.exe /issorted /list
if "%errorlevel%" == "1" goto NotSort
echo The partition entries in the MBR are already sorted.
goto EXIT


:NotSort
set INPUT=
echo The partition entries in the MBR are not sorted.
echo Do you want MBRWizard to sort the partition entries ?
echo.
echo Press [ENTER] to abort.
echo.
set /p INPUT="Enter [y]es or [n]o: "
echo.
if /I "%INPUT%" == "" goto EXIT
if /I "%INPUT%" == "n" goto EXIT
cls
echo Running: mbrwiz.exe /sort /list
echo.
mbrwiz.exe /sort /list
if "%errorlevel%" == "0" goto SUCCESS
goto EXIT


:SUCCESS
echo Operation completed successfully.
echo.
goto EXIT


:EXIT
set _exit=
echo.
echo Do you want to exit MBRWiz ?
echo.
set /p _exit="Enter [y]es or [n]o: "
if /I "%_exit%" == "" goto EXIT
if /I "%_exit%" == "n" goto MENU
if /I "%_exit%" == "y" goto END


:BOOTMENU
cls
echo Running: mbrwiz.exe /bootmenu
echo.
mbrwiz.exe /bootmenu
echo.
if "%errorlevel%" == "0" goto SUCCESS
echo.
goto EXIT


:_ERROR1
echo.
echo ERROR: %MBRWIZFILE% file not found
echo Kindly check if you have downloaded the MBRWiz from
echo http://www.mbrwizard.com
goto END


:END
endlocal
------------- END 1mbrwiz.cmd codes --------------------------


References:

[1] MBRWizard Reference Guide

[2] "Operating System Not Found" or "Missing operating system" error message when you start your Windows XP-based computer

Saturday, July 19, 2008

Johor police hotline (Rev: 1.2)


If you are in Johor and need police assistance, call the 24-hour hotline 07-2212999 which are manned by officers who speak English, Chinese, Malay and Tamil. The Johor police assured that they will respond to all complaints within 15 minutes. They will also inform the callers of the outcome of their investigations and follow-up actions. This was the latest efforts aimed at reducing the crime rate in Johor.


MyDistress
(Only available in Selangor)

MyDistress is a service by the Royal Malaysia Police, Selangor (雪兰莪州) Contingent (分遣队) in an effort to keep Selangor safer. You should use MyDistress service to alert police in situation when you need an immediate response - if a crime/incident is happening now or if anyone/property is in imminent (逼近的) danger. If a person misuse MyDistress whereby the request for immediate response is not an action deemed emergency, Polis Di-Raja Malaysia (PDRM) reserves the right to suspend MyDistress services to the user.

MyDistress application is designed for Iphone, Android, BlackBerry or J2ME which can be downloaded from http://mydistress.net/download.html.


References:

[1] Today (19-20 July 2008, 4, News, Call this 24-hour police hotline if you need help in Johor)

[2] MyDistress

Monday, July 7, 2008

Videos (Rev: 1.7)


If you cannot see the flash video, please install Adobe Flash Player 9.0.124.0 or higher version. If you still face problem after installing the Adobe Flash Player, please refer to "No flash video displayed" error in YouTube.


Sim Lim Square 警戒(けいかい)した店(みせ): Square United.Cam (#02-72)
Beware of Sim Lim Square shop: Square United.Cam (#02-72)


Sim Lim Square Level 2 stores
http://www.simlimsquare.com.sg/store_list-l2-p4.php


Sim Lim Square is a famous Electronics and Computer Centre in Singapore. A guy who wished to buy a HD Sony video camera had ended up being convinced to pay $1760 for an inferior Sanyo video camera ($900) with accessories. When he tried to claim a refund, he was verbally abused by the salesman.


You Singaporean?


A day in the life of a typical working class Singaporean named Terry reveals to us many Singaporean characteristics that we do not pay much attention to. This film shows how little things can bring out the "Singaporean-ness" in us, and gives us a good reason to be proud of our country.


Phone Salesman Amazes Crowd - Paul Potts


Paul is a ordinary man like everyone of us. He dreams to become a singer but he lacks confident in himself. Most people tends to judge a person from their look during first impression. Paul shown us that he might not looks handsome but he got talent.


Be Inspired by Nick Vujicic (life without limbs)


Whenever you feel suffering, being treat unfairly, etc, please remember that there is always someone more suffering than you. Nick is a man borns without limbs and his story always inspires me. I hope it can inspires you too !!!!!

Tuesday, July 1, 2008

Xming (Rev: 1.2)


Unlike Starnet X-Win32 which you can evaluate it free for 30 days, Xming is a free X Window Server for Microsoft Windows (XP/2003/Vista) Operating System (OS) that enables secure graphical access to remote machines that run Linux or Unix OS. After connection to the remote machine is established, you can run the graphical applications from the remote machines in your windows pc desktop.

Assumptions:
  • Windows pc where Xming is installed is Windows XP Professional SP3 OS.
  • Remote host is SUN Solaris 10 or higher version OS running Java Desktop System (JDS).
  • You have login to the NUS network using wired connection. If you are using wireless connection (NUS), please login to the WebVPN first before trying to connect to the remote Linux/Unix host.


Procedures:
  1. Please download and install Xming 6.9.0.31 or higher version, and Xming-fonts 7.3.0.18 or higher version in your Windows pc. During installation of Xming, please ensure that you have choose the default options on "Full installation" and "Associate XLaunch.exe with the .xlaunch file extension". During installation of Xming-fonts, please install Xming-fonts in the same directory as Xming and install all the fonts including 100dpi fonts, DejaVu TTFs and Cyrillic fonts. You will only need to download and install the alternative Mesa libraries, Xming-mesa (a capable software-only implementation of the OpenGL renderer) if you have an awkward X client that is failing to render.

  2. After installing Xming and Xming-fonts in your Windows pc, we need to use XLaunch to setup a profile for connecting to the remote host: assume a SUN Fire V480 server running JDS. Please click Start -> All Programs -> Xming -> XLaunch and set the profile settings as shown below:
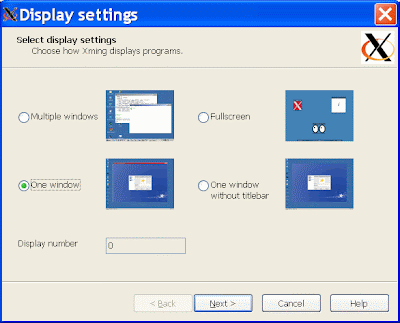
    Select Display Setting
    Please click "One window" option and click "Next >".


    Session Type
    Please click "Start a program" and click "Next >".


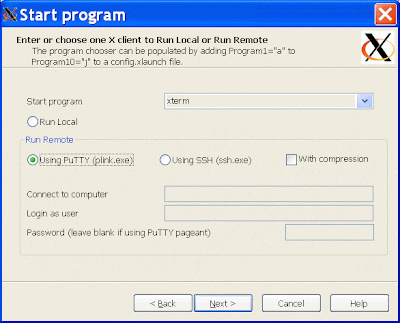
    Start Program
    In Start Program, kindly change the default xterm program to /usr/bin/gnome-session in order to run the JDS in the remote SUN Fire V480 server.

    Common program commands include:

    • For GNOME (RedHat): /usr/bin/gnome-session
    • For KDE (SuSE): /opt/kde3/bin/startkde
    • For KDE (Fedora Core): /usr/bin/startkde
    • For CDE (AIX ): /usr/dt/bin/Xsession
    • For CDE (Solaris): /usr/dt/bin/Xsession
    • For JDS (Solaris 10): /usr/bin/gnome-session


    Then, kindly click to select the "Using PuTTY (plink.exe)". Please enter the remote machine hostname or IP address at the Connect to computer and kindly enter your login userID in the Login as user. Please leave the password blank for security reason. Kindly click "Next >" to continue.
    Additional Parameter


    Please click "Next >".
    Finish Configuration


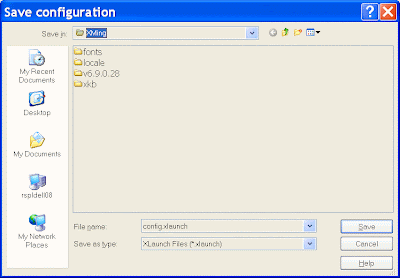
    Please click "Save configuration" to save your profile setting so that you can use this profile for future connection to the remote host. Save Configuration
    Please change the default config.xlaunch file name to another file name such as "SUNFire_V480.xlaunch" so that you know that this profile is for the SUN Fire V480 server. Kindly click the "Save" button to save your configuration. Finally, please click the "Finish" button to finish your configuration using XLaunch.

  3. Please copy the "SUNFire_V480.xlaunch" file and paste it to your desktop for convenient launching of this profile from your desktop. Please do not copy the "SUNFire_V480.xlaunch" file and paste it as shortcut to your desktop because Xming will fail to work.

  4. Kindly double-click the "SUNFire_V480.xlaunch" file on your desktop to start connecting to the remote SUN Fire V480 server. When you connect to a remote host computer for the first time using public-key authentication, the remote host sends your local computer its public key in order to identify itself. Kindly click Yes to store the host key on your local computer. If you save the host key, you do not have to go through this procedure again the next time you login. The host's public key will still be checked with each connection, but this will be done automatically, without user intervention. You will be prompt to enter your password: Enter password
    Please enter your password and you will be connected to the remote host and present with the desktop environment (depending on the command you use) of the remote host in your Windows pc.

Notes:

1) After creating a xxx.xlaunch profile for the remote host using XLaunch, you can simply copy and paste this xxx.xlaunch profile on your desktop. Then, change it to a different name such as yyy.xlaunch to reflect another remote machine profile. After that, edit this new yyy.xlaunch profile with an editor such as WordPad in your Windows pc to change it values so that you do not need to run the XLaunch to create a new profile again. Common values in the yyy.xlaunch profile that you will edit are the Program="/xxx/xxx/xxx", RemoteUser="xxx" and RemoteHost="xxx.xxx.xxx.xxx" values.


2) Please ensure that your firewall setting in your Windows pc allows Xming X Server to have incoming network access to your Windows pc.


3) After connecting to the remote host using Xming, it is recommended that you log out normally from the remote host first before closing the Xming window (by clicking the X Xming window from the top RHS of the Xming window) to end your connection.

When prompt with the below message:
Xming - Exit ? Exiting will close all screens running on this display. There are currently xx clients connected. Proceed will shutdown of this display/server ?

Kindly click the "exit" button to end your Xming connection.


Reference:

[1] Xming

Wednesday, June 25, 2008

Rip music using Windows Media Player (Rev: 1.1)


My niece asked me on how to rip music from the music CD and store it as mp3 format in her (Windows XP OS) computer so that she can transfers the mp3 music to her handphone later. You can use Windows Media Player (free) to rip music and save it as mp3 format. You can download Windows Media Player 11 (24.5 MB) for Windows XP OS from Microsoft website.

Assume you are using Windows Media Player 11 in Windows XP computer and have placed your music CD into your CD/DVD drive:
  1. Kindly click Start -> All Programs -> Windows Media Player.

  2. In Windows Media Player, kindly click the Rip button. Click the CD/DVD drive that you have placed your CD. Your list of song tracks will automatically appear and are all selected by default. You can uncheck those songs that you don't want to rip by clearing the check box next to the song. You can also use the check box at the top of the list to select or clear all check boxes.

    Rip

  3. Before ripping, please click Rip -> More Options. You can change the rip music storing location, format (eg: mp3), audio quality, etc. Kindly click OK after you have changed your settings.

    Options

  4. Kindly click the Start Rip button to start ripping your selected songs.

    The first time you rip music, you are prompted to choose the format for the files being created. Please click one of the following options:
  • Keep my current format settings. This option keeps your current file format and audio quality level settings and immediately starts ripping the songs you selected to your computer. By default, Windows Media Player uses the Windows Media Audio (wma) format, which optimizes the balance between file size and sound quality.

  • Change my current format settings. Select this option if you want to change the format, bit rate, storage folder, or other options.

    After you click an option, click OK.

After the songs have been ripped, you can find and play them in your library.

Tuesday, June 24, 2008

"No flash video displayed" error in YouTube (Rev: 1.1)


Situation

In YouTube website, my niece's computer (Windows XP OS) running Internet Explorer (IE) version 7 browser cannot see the flash video displayed on her screen. The error message was

"Hello, you either have JavaScript turned off or an old version of Macromedia's Flash Player. Get the latest Flash player".

She had already installed the latest Adobe Flash Player version 9.0.124.0 for IE 7 from Adobe website but it still did not work.


Solution

1) Open the Window Explorer. Kindly navigate to C:\WINDOWS\system32\Macromed\Flash folder

2) Locate the file FlashUtil9f.exe and double-click to run it. This will reinstall the Adobe Flash player so that it will display the flash video correctly in YouTube website.

"Boot command is disabled" error in OBP (Rev: 1.1)


Situation

When the Sun Fire V480 server with Solaris 9 Operating System (OS) is power on, the screen is blank for a long period of time (more than 15 minutes) before it finally show the diagnostic result and an ok prompt. I decided to upgrade the OS to Solaris 10. I placed the Solaris 10 5/2008 (SPARC) DVD into the DVD drive.

From the ok prompt,
ok boot cdrom
-> boot command is disabled


Solution

Although the Sun Fire V480 server switch is turned to the normal power on position, I suspected the server was in diagnostic mode during power on because it showed the diagnostic result and the diag-switch environment is set to true. Hence, I tried the below steps:

ok setenv diag-switch? false
ok reset-all

The server will auto reboot itself and boot to the ok prompt. This time, the diagnostic result is not shown. I tried the below:

ok boot cdrom

and the server boot from the DVD normally.

After installing the Solaris 10 OS, I change the diag-passes environment variable in the eeprom from 1 to 0 in order to make the server boot up faster:

# eeprom diag-passes=0