Monday, August 13, 2012

Solved changing Microsoft Office 2010 from Chinese user interface to English user interface without reinstalling Microsoft Office 2010 in Windows XP x86 OS (Rev: 1.0)


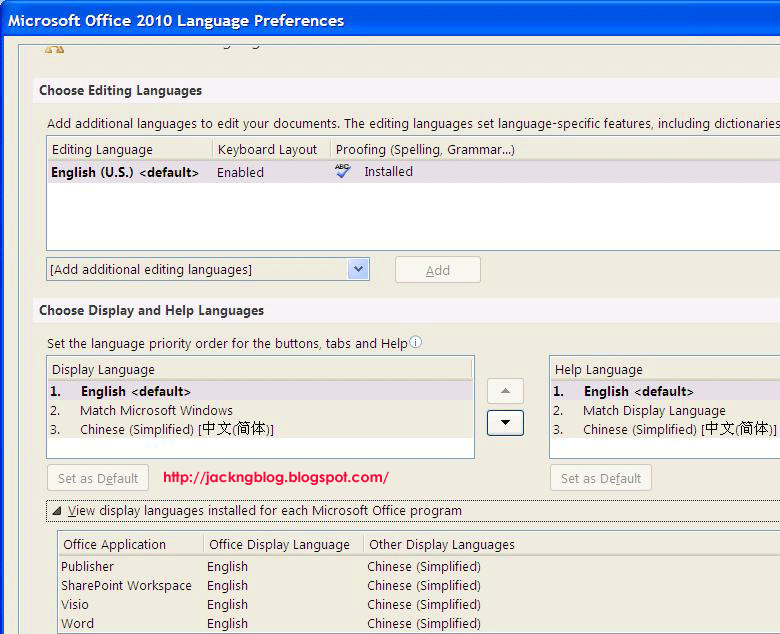
For BENQ JoyBook S42 notebook with Windows XP Professional SP3 x86 Operating System (OS), the Microsoft Office 2010 default Display Language and Help Language are shown as Chinese language. Although the Windows XP Professional SP3 OS default input language was already set as English (United States) language, the Microsoft Office 2010 default Display Language was set to match the Microsoft Windows interface language (English), and the default Help Language was set to match the display language (English), the Microsoft Office 2010 user interface is still Chinese language as shown below:


Solution to change Microsoft Office 2010 from Chinese user interface to English user interface without reinstalling Microsoft Office 2010

  1. You will need to buy an Microsoft Office 2010 English Language Packs (S$32.55), or you can download the various Microsoft Office 2010 Language Packs from "My Digital Life: Office 2010 Language Packs (version 14.0.4730.1010) Free Official Direct Download Links".

  2. Assume you have already downloaded the "Microsoft Office 2010 English Language Pack 32-bit (x86): X16-37701.exe" (435,987,576 bytes). Kindly double-click the X16-37701.exe to install the Microsoft Office 2010 English Language Pack 32-bit. At the "Select a Microsoft Office Product" window, please select "Microsoft Office Language Pack 2010 - English" and click the "Continue" button. Kindly accept the Microsoft License Agreement and click the "Install Now" button to start the installation.

  3. After the installation has completed, in Windows XP OS, please go to Start -> All Programs -> Microsoft Office -> Microsoft Office 2010 Tools -> Microsoft Office 2010 Language Preferences. Please set the default Display Language and Help Language as English. You will be prompt the below:

    Microsoft Office 2010 Language Preferences Change
    You have changed your language preferences. For these changes to take effect, you must restart Office. Save your work, and then close all Microsoft Office programs.

  4. Kindly save your work and restart Microsoft Office 2010. Your Microsoft Office 2010 user interface (excluding Microsoft Visio 2010) had successfully changed from Chinese to English language user interface as shown below:


  5. (optional) If you have also installed Microsoft Visio 2010, please repeat step 2 except that at the "Select a Microsoft Office Product" window, please select "Microsoft Visio Language Pack 2010 - English". Kindly click the "Continue" button and accept the Microsoft License Agreement. Click the "Install Now" button to start the installation for Microsoft Visio Language Pack 2010 - English. After the installation had completed, the Microsoft Visio 2010 user interface will change from Chinese to English language user interface.

Monday, August 6, 2012

Solved changing SATA operation mode in BIOS from IDE to AHCI without reinstalling Windows XP x64 OS for ASUS P8H77-M motherboard (Rev: 1.0)


Before the Windows XP x64 Operating System (OS) installation process on Asus P8H77-M motherboard computer that has Intel H77 Express Chipset, the SATA configuration mode in the BIOS by default is set to IDE and not RAID/AHCI. Hence, the RAID/AHCI drivers are not loaded during the Windows XP x64 OS installation process.

After installing the Windows XP x64 OS, I have failed to install the Intel Rapid Storage Technology Driver software v11.1.0.1006 (under SATA category) for Windows XP 32/64 bit & Win7 32/64 bit (WHQL). If I set the BIOS SATA configuration mode from IDE to AHCI (Advanced Host Controller Interface), the computer will get a blue screen "STOP 0x0000007B" error during bootup because the Windows XP x64 OS failed to load the AHCI drivers to detect the Seagate 2 TB SATA3 hardisk.


Solutions to change SATA operation mode in BIOS from IDE to AHCI without reinstalling Windows XP x64 OS for ASUS P8H77-M motherboard
  1. Please download iaStor_64bit_forAHCI_WinXPSP2x64.rar and also the Intel Rapid Storage Technology Driver software v11.1.0.1006 for Windows XP 32/64bit & Win7 32/64bit (WHQL) from Asus website.
    [iaStor_64bit_forAHCI_WinXPSP2x64.rar MD5 checksum: 83c42559d0ca79bc4290a305c2f39c88]

    Files inside the iaStor_64bit_forAHCI_WinXPSP2x64.rar:

    • iaStor.sys (568, 600 bytes, v11.1.0.1006, 64 bit driver)
      The iaStor.sys is from the Asus P8H77-M motherboard download site, under SATA category for Intel Rapid Storage Technology Driver software v11.1.0.1006 (Intel_Rapid_V11101006_XPWin7.zip) for Windows XP 32/64bit & Win7 32/64bit (WHQL). After unzip the Intel_Rapid_V11101006_XPWin7.zip file, the iaStor.sys is under the \Driver\64bit directory.

    • ASUS P8H77-M_AHCI_HKLM_CCS_iaStor.reg file:

      Windows Registry Editor Version 5.00

      [HKEY_LOCAL_MACHINE\SYSTEM\CurrentControlSet\services\iaStor]
      "Type"=dword:00000001
      "Start"=dword:00000000
      "ErrorControl"=dword:00000001
      "Tag"=dword:00000019
      "ImagePath"="system32\\drivers\\iaStor.sys"
      "DisplayName"="Intel AHCI Controller"
      "Group"="SCSI Miniport"

      [HKEY_LOCAL_MACHINE\SYSTEM\CurrentControlSet\services\iaStor\Parameters]
      "BusType"=dword:00000003

      [HKEY_LOCAL_MACHINE\SYSTEM\CurrentControlSet\services\iaStor\Enum]
      "0"="PCI\\VEN_8086&DEV_1E02&SUBSYS_84CA1043&REV_04\\3&11583659&0&FA"
      "Count"=dword:00000001
      "NextInstance"=dword:00000001

    • ASUS P8H77-M_AHCI_HKLM_CS001_iaStor.reg file:

      Windows Registry Editor Version 5.00

      [HKEY_LOCAL_MACHINE\SYSTEM\ControlSet001\Control\CriticalDeviceDatabase\pci#ven_8086&dev_1e02&cc_0106]
      "Service"="iaStor"
      "ClassGUID"="{4d36e96a-e325-11ce-bfc1-08002be10318}"

  2. In Windows XP x64 environment, please copy the iaStor.sys to the C:\WINDOWS\system32\drivers directory. Then, kindly right-click on ASUS P8H77-M_AHCI_HKLM_CCS_iaStor.reg and click "Merge" to add the registry to the Windows XP x64 OS. Please also right-click on ASUS P8H77-M_AHCI_HKLM_CS001_iaStor.reg and click "Merge" to add the registry to the Windows XP x64 OS. Please restart the computer and go to BIOS (DO NOT allow the Windows XP x64 OS to start the bootup process).

  3. During computer bootup, I pressed [DELETE] to enter BIOS. In BIOS, I clicked Advanced Mode -> Advanced -> SATA Configuration -> SATA Mode Selection and changed the SATA Mode from IDE to AHCI. I pressed [F10] to save the configuration and reset the BIOS. The Windows XP x64 OS boot up successfully without the blue screen "STOP 0x0000007B" error.

  4. I login to Windows XP x64 OS. Windows XP x64 OS will automatically shown a wizard to install the new detected hardware drivers. I cancel the wizard. I opened a Windows Explorer, go to the extracted directory of Intel Rapid Storage Technology Driver software v11.1.0.1006 and double-click the setup.exe to install the Intel Rapid Storage Technology Driver software v11.1.0.1006. Once the installation is successfully, it will prompt me to restart the computer to apply these changes. I clicked the "Finish" button to restart the computer.

  5. I login to Windows XP x64 OS. Under the Device Manager -> IDE ATA/ATAPI controllers, you will see an Intel(R) 7 Series/C216 Chipset Family SATA AHCI Controller.


Reference

[1] HOWTO: enable AHCI mode after installing Windows